


22
SERVSWITCH™ AND SERVSWITCH ULTRA™
3.2 Installation Procedure
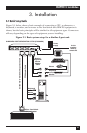
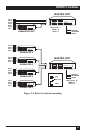
This section provides complete instructions for the hardware setup of a single
ServSwitch. (For detailed instructions on the capabilities and concerns involved in
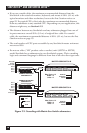
installing a cascaded Switch system, see Section 3.3; to make troubleshooting
the
installation easier, we recommend that you check the master and each submaster
as
it is installed, rather than installing all units, then checking the entire cascade.) For
an illustrated example of the elements of a basic setup, see Figure 3-1 on the
previous page.
3.2.1 R
ACKMOUNTING (OPTIONAL)
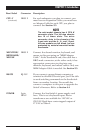
If you want to mount the Switch in a rack, you will need a ServSwitch
Rackmounting Kit. For the mini models, our product code for a 19", 23", or 24" Kit
is RMK19M, RMK23M, or RMK24M respectively. For the slimline models, our
product code for a 19", 23", or 24" Kit is RMK19S, RMK23S, or RMK24S
respectively. For the full-size models, our product code for a 19", 23", or 24" Kit is
RMK19F, RMK23F, or RMK24F respectively. See Appendix G for more
information.
3.2.2 C
ONNECTING THE MONITOR, KEYBOARD, AND MOUSE
A Monitor/Keyboard/Mouse (MKM) Adapter Cable connects your monitor,
keyboard, and mouse to the Switch. Because various styles of electrical connectors
are used by different classes of equipment, we supply this cable in various styles to
match (see Appendix B). This cable also comes in the different lengths supported
by different applications (see Section 4.1.3, Appendix B, and the first Caution
notice on the next page).
CAUTION!
Make very sure that the monitor, keyboard, and mouse you plan to use
can meet the demands of your application—see Section 4.1. Also, note
that the ServSwitch doesn’t support dongles at the time of this writing.
1. After you verify that the Switch is turned OFF, plug the DB25 male connector
of the MKM Adapter Cable into the port labeled MONITOR/KEYBOARD/
MOUSE on the Switch’s rear panel.
2. If your common equipment is IBM type, plug the cables from your shared
monitor, keyboard, and mouse into the corresponding connectors on the other
ends of the MKM Adapter Cable. If your common equipment is Mac or Sun type,
plug the mouse cable into the keyboard, and plug the monitor and keyboard
cables into the corresponding connectors on the other ends of the MKM cable.