


49
EN
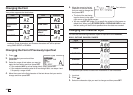
4.
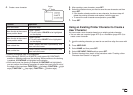
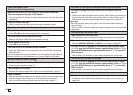
Create a user character.
Function Operation
Move the cursor. Use arrow keys.
Make the dot at the current
cursor position black.
Press 1 (black).
•
This will cause 1 BLACK to be highlighted
on the display.
Make the dot at the current
cursor position white.
Press 2 (white).
•
This will cause 2 WHITE to be highlighted
on the display.
Draw a black line.
Press 1 (black) and then 3 (continuous), and
then move the cursor.
Draw a white line.
Press 2 (white) and then 3 (continuous), and
then move the cursor.
•
Drawing of diagonal lines is not supported.
•
After pressing 1 (BLACK) or 2 (WHITE), each press of 3 (CONTINUE)
enables or disables continuous line drawing. While continuous line drawing
is enabled, 3 CONTINUE is highlighted on the display.
•
While continuous line drawing is disabled (3 CONTINUE not highlighted),
you can perform the following operations to make the cursor jump to one of
the edges of the input area: FUNCTION +
(left edge), FUNCTION + (right
edge), FUNCTION + (top edge), FUNCTION + (bottom edge).
5.
After creating a user character, press SET.
6.
Select the location where you want to save the user character and then
press SET.
•
If the location already contains a user character, the above step will
delete the existing character and replace it with the new one.
•
To cancel the user character save operation, press ESC.
7.
Press SET.
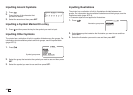
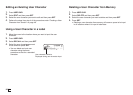
Using an Existing Printer Character to Create a
User Character
You can create a user character based on an existing printer character.
•
You can also use a symbol (page APP-3) or a illustration (page APP-4) to
create a user character.
1.
Input the existing character you want to use and then align the cursor with
it.
2.
Press USER CHR.
3.
Select MAKE and then press SET.
4.
Select USE INPUT CHAR and then press SET.
5.
Perform the steps from step 4 of the procedure under "Creating a User
Character from Scratch" on page 49.
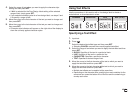
Scale
Scale
Cursor