


3-18
Cisco uBR924 Software Configuration Guide
OL-0337-05 (8/2002)
Chapter 3 Advanced Data-Only Configurations
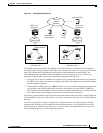
L2TP Example
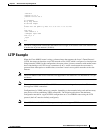
Note For more details on the L2TP feature, see the Layer 2 Tunnel Protocol and L2TP Dialout feature
modules, available on CCO and the Documentation CD-ROM.
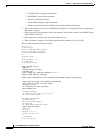
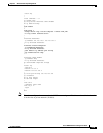
The following sections show sample configurations for the Cisco uBR924 router acting as the LNS. The
relevant commands are in bold.
version 12.1
no service pad
service timestamps debug uptime
service timestamps log uptime
!
hostname Router
!
class-map class-default
Command Purpose
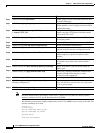
Step 1
uBR924(config)# vpdn enable Enable VPDN services so that the router will look
for tunnel definitions.
Step 2
uBR924(config)# vpdn-group 1 Create a unique VPDN group (1–3000) to which
VPDN attributes can be assigned, and enter VPDN
configuration mode.
Step 3
uBR924(config-vpdn)# accept dialin l2tp virtual-template
1 remote L2TP_LAC
Configure the VPDN group to accept a incoming
request using the L2TP protocol from the remote
peer named L2TP_LAC.
Step 4
uBR924(config-vpdn)# l2tp ip tos reflect (Optional) Preserve the type of service (TOS) bits in
the original packets.
Step 5
uBR924(config-vpdn)# exit Return to global configuration mode.
Step 6
uBR924(config)# no l2tp tunnel authentication Disable L2TP tunnel authentication.
Step 7
uBR924(config)# interface Virtual-Template1 Create a virtual access interface from the virtual
template and enter interface configuration mode.
Step 8
uBR924(config-if)# ip unnumbered Ethernet0 Enable IP traffic on the virtual access interface
without requiring a specific IP address for the
interface.
Step 9
uBR924(config-if)# no ip directed-broadcast Disable the forwarding of directed broadcasts on
this interface to prevent some common hacker
attacks.
Step 10
uBR924(config-if)# peer default ip address pool dialup Obtain an IP address from the default dialup IP
address pool.
Step 11
uBR924(config-if)# ppp authentication chap Enables the Challenge Handshake Authentication
Protocol (CHAP) on the interface to allow
verification of the remote end.
Step 12
uBR924(config-if)# Ctrl-z Return to privileged EXEC mode.
Step 13
uBR924# copy running-config startup-config
Building configuration...
Save the configuration to nonvolatile memory so
that it will not be lost in the event of a reset, power
cycle, or power outage.
Step 14
uBR924# show startup-config Display the configuration file that was just created.