


Configuring the Optional Wireless Adapter
This section describes how to configure a wireless adapter.
You can select a method to configure a wireless adapter from the following:
Wizard Setup through USB Cable(recommended)
WPS-PBC
*1*3
WPS-PIN
*2*3
Advanced Setup through Operator Panel
Ethernet Cable
Dell Printer Configuration Web Tool
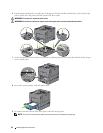
*1 WPS-PBC (Wi-Fi Protected Setup-Push Button Configuration) is a method to authenticate and register devices required for wireless
configuration, by pressing the button provided on the access point via wireless routers, and then performing WPS-PBC setting on the
operator panel. This setting is available only when the access point supports WPS.
*2 WPS-PIN (Wi-Fi Protected Setup-Personal Identification Number) is a method to authenticate and register devices required for wire-
less configuration, by entering PIN assignments in the printer and computer. This setting, performed through access point, is available
only when the access points of your wireless router supports WPS.
*3 WPS 2.0 compliant. WPS 2.0 works on access points with the following encryption types: Mixed mode PSK, WPA-PSK AES,
WPA2-PSK AES, WPA-PSK TKIP, Open (No Security)
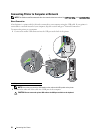
NOTE: The optional wireless adapter must be installed on the printer. For information on how to install a wireless adapter, see
"Installing the Optional Wireless Adapter."
. NOTE: If the Panel Lock Control is set to Enable, you need to enter the four digit password to enter the Admin
Settings
menu.
.
NOTE: For details about using WPA-Enterprise-AES, WPA2-Enterprise-AES, or WPA-Enterprise-TKIP, see "Using Digital
Certificates."
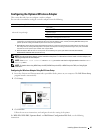
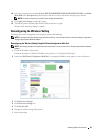
Configuring the Wireless Adapter Using Dell Printer Setup
1
Insert the
Software and Documentation
disc provided with the printer on your computer. The
Dell Printer Setup
program launches automatically.
2
Click
Setup
.
Click
Wireless
.
Follow the on-screen instructions, and configure the wireless setting of the printer.
For WPS-PIN, WPS-PBC, Operator Panel, and Dell Printer Configuration Web Tool, see the following
instructions.
Installing Optional Accessories 45
3