


170 Removing and Installing Parts
3
Align the screw holes on the I/O panel with the screw holes on the chassis,
and replace the two screws.
4
Reconnect the cable that attaches the power button to the I/O panel.
5
Reconnect the 1394 cable, and audio cable (if it exists and you had
removed it).
6
Reconnect the control-panel cable to the I/O panel connector.
7
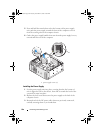
Replace the front bezel by aligning the six tabs on the corresponding slots
on the front chassis and snapping it back into place. Replace the two
screws that secure the bezel to the bottom of the chassis.
8
Replace the processor airflow shroud (see "Installing the Processor Airflow
Shroud Assembly" on page 149) and the Processor fan assembly (see
"Installing the Processor Fan Cage" on page 150 and "Installing the
Processor Fan" on page 152).
9
Connect the card fan assembly (see "Installing the Card Fan" on
page 154)to the system board.
10
Replace the computer cover (see "Replacing the Computer Cover" on
page 172).
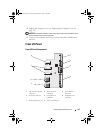
Coin-Cell Battery
Replacing the Coin-Cell Battery
CAUTION: Before you perform any of the procedures in this section, follow the
safety instructions in the Product Information Guide.
NOTICE: To prevent static damage to components inside your computer, discharge
static electricity from your body before you touch any of your computer’s electronic
components. You can do so by touching an unpainted metal surface on the
computer.
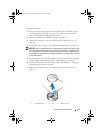
A coin-cell battery maintains computer configuration, date, and time
information. The battery can last several years. If you have to repeatedly reset
time and date information after turning on the computer, replace the battery.
CAUTION: A new battery can explode if it is incorrectly installed. Replace the
battery only with the same or equivalent type recommended by the manufacturer.
Discard used batteries according to the manufacturer’s instructions.
book.book Page 170 Tuesday, November 27, 2007 10:29 AM