


158 Removing and Installing Parts
To replace the battery:
1
Record all the screens in system setup (see "System Setup" on page 166) so that you can restore the
correct settings after the new battery has been installed.
2
Follow the procedures in "Before You Begin" on page 85.
3
Open the computer cover (see "Removing the Computer Cover" on page 86).
4
Locate the battery socket (see "System Board Components" on page 89).
NOTICE: If you pry the battery out of its socket with a blunt object, be careful not to touch the system board with
the object. Ensure that the object is inserted between the battery and the socket before you attempt to pry out the
battery. Otherwise, you may damage the system board by prying off the socket or by breaking circuit traces on the
system board.
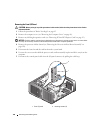
5
Remove the battery by prying it out of its socket with your fingers.
6
Insert the new battery (CR2032) into the socket with the side labeled
"+" facing up, and press the battery into place.
7
Replace the computer cover (see "Replacing the Computer Cover" on
page 159).
NOTICE: To connect a network cable, first plug the cable into the network port
or device and then plug it into the computer.
8
Connect your computer and devices to electrical outlets, and turn
them on.
9
Enter system setup (see "System Setup" on page 166) and restore the settings you recorded in step 1.
10
Properly dispose of the old battery. See the
Product Information Guide
for battery disposal information.
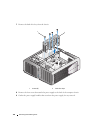
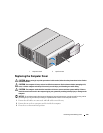
Removing the Computer Stand
CAUTION: Before you begin any of the procedures in this section, follow the safety instructions in the Product
Information Guide.
CAUTION: Your computer is heavy and can be difficult to maneuver. Seek assistance before attempting to lift,
move, or tilt the computer and always lift correctly to avoid injury; avoid bending over while lifting.
CAUTION: The computer stand should be installed at all times to ensure maximum system stability. Failure to
install the stand could result in the computer tipping over, potentially resulting in bodily injury or damage to the
computer.
1
Follow the procedures in "Before You Begin" on page 85.
2
Loosen the captive screw securing the stand to the base of the computer.
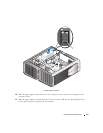
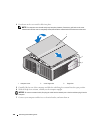
3
Gently slide the stand back, towards the rear of the computer, then pull the stand away from the
computer to remove it.