


96 Removing and Installing Parts
6
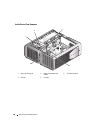
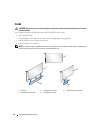
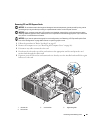
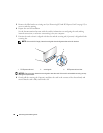
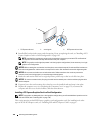
Press the release tab (if present) on the system board connector as you grasp the card by its top corners,
and then ease the card out of the connector.
NOTE: If the card is full length, press the release tab on the end of the alignment guides on the fan bracket.
7
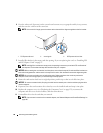
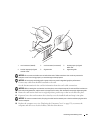
Install a filler bracket in the empty card-slot opening. If you are replacing the card, see "Installing PCI
and PCI Express Cards" on page 97.
NOTE: Installing filler brackets over empty card-slot openings is necessary to maintain FCC certification of
the computer. The brackets also keep dust and dirt out of your computer.
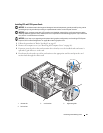
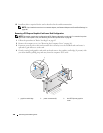
NOTICE: Before rotating the card retainer back into place, ensure that the tops of all cards and filler brackets are
flush with the alignment bar and the notch in the top of each card or filler bracket fits around the alignment guide.
NOTICE: Do not route card cables over or behind the cards. Cables routed over the cards can prevent the
computer cover from closing properly or cause damage to the equipment.
8
Rotate the card retainer back into its original position; push its tip so that its tab clicks into place.
NOTICE: To connect a network cable, first plug the cable into the network port or device and then plug the cable
into the computer.
9
If present, lower the card retention device that lays over the installed cards and snap it into place.
10
Replace the computer cover (see "Replacing the Computer Cover" on page 159), reconnect the
computer and devices to electrical outlets, and then turn them on.
11
Uninstall the driver for the card that you removed.
NOTE: If you removed a sound card or a network adapter, see "Network Adapter and Sound Card Settings" on
page 105.
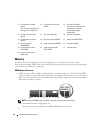
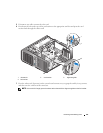
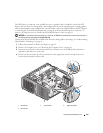
1 PCI Express x16 card 2 securing tab 3 PCI Express x16 card slot
1
3
2