


D-Link DIV-140 User Guide 9
Configuration
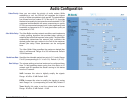
Once powered on, the DIV-140 will be at its default configuration parameters. The default IP address of the device is 10.0.0.1. You can
configure the device either through the web UI or Command Line Interface (CLI).
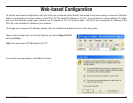
In order to use a web browser to configure the device, you must make sure the device has a valid Ethernet connection to a PC or LAN via
its Ethernet port. We recommend using a recent version of the above mentioned browsers. The browser must have JavaScript enabled.
You must make sure the PC is in the same IP subnet as this device (10.0.0.1). You can do this by changing the IP address of the PC.
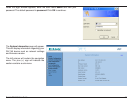
Type https://10.0.0.1 in the web browser address bar to access the web UI. Login with default user name and password as admin and
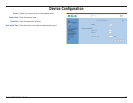
password. Refer to the “Web Configuration” section of this manual or online help for further details.
The network related parameters can also be configured through the CLI. Using a terminal emulator on your PC, you can modify these
parameters as per your network settings.
For examples and details of commands used here you can refer to CLI Commands section of this manual. Type question mark ‘?’ to see
the online help of command.
A. Enter user name as ‘admin’ and password as ‘password’.
B. Type ‘help’ to see the list of available commands.
C. Type ‘show nw’ to see the current network settings.
D. Change the IP mode using command ‘set nw mode’.
E. If IP mode is static IP use ‘set nw ip’ to set the new IP.
F. If IP mode is PPPoE use ‘set pppoe auth’ to set the user name and password.
G. Type ‘save’ to save the changes.
Now you can access the web interface of device using the new IP you have configured. Type https://<IPAddress> in your browser.