


86 Printing and Scanning Without a Computer
■ Small Image: To boost the appearance of small images taken from
mobile phones and low-resolution PDAs, set this option to
On. (Make
sure to turn this option
Off when printing most photos, or your printer
will print slowly.)
■ Brightness: If your prints are too dark or bright, use this setting to adjust
them.
■ Contrast: To increase the contrast, choose High or Super High.
■ Sharpness: Adjust this setting to sharpen or soften your prints.
■ Saturation: Choose More or Most for stronger colors, or choose Less or
Least for softer colors.
■ Date: Prints the date with your photo in one of the following formats:
yyyy.mm.dd (2004.12.12), mmm.dd.yyyy (Dec.12.2004),
dd.mmm.yyyy (12.Dec.2004), or None (no date).
■ Time: Prints the time with your photo in one of the following formats:
12-hour system (9:00), 24-hour system (21:00), or None (no time
printed).
■ Print Info: Set this to On to print your camera’s exposure time (shutter
speed), F-stop (aperture), and ISO speed.
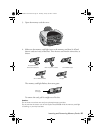
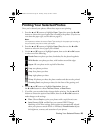
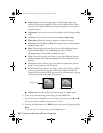
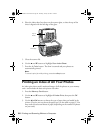
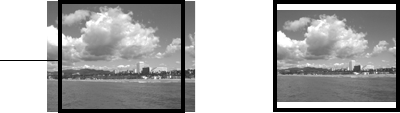
■ Fit to Frame: If your photo is too long or wide to fit inside the available
space on your selected layout, part of the image will be automatically
cropped. Set this option to
Off if you want to turn off automatic cropping
(leaving white space at the edges of the photo).
■ Bidirectional: Set this to On if you want to print at a higher speed.
6. When you’re done adjusting print settings, press the
OK button.
7. If you want to print multiple sets of your entire print job, press the u and d
buttons to choose a number of sets to print (1 to 99).
8. Press the x
Color button or x B&W button. Your print job begins printing.
Note:
To cancel a print job while printing, press the y Stop button.
Fit to Frame turned on Fit to Frame turned off
Cropped area
SP RX600 Users Guide.book Page 86 Thursday, January 29, 2004 1:08 PM