


Using the Computer Interface
Using the RS-232 Computer Interface
4
4-5
5. Press G or D to scroll to odd, even, or no parity, respectively. Press EE to
select the displayed parity.
6. "Echo" now appears in the right display, with "On" or "OFF" appearing on the left
display.
When Echo is "On", each character sent to the instrument over the RS-232 interface
is "echoed" back to the host. If Echo is "OFF", commands are not echoed.
Press D or G to select echo "On" or "OFF". Then press E to accept the
displayed setting.
Autoprint and Memory Storage (RS-232)
Instrument measurements can be automatically sent to an RS-232 serial printer
(Autoprint) or to internal Memory Storage. Both the Hydra Series II Data Acquisition
Unit and the Hydra Series II Data Logger have the Autoprint function; only the Hydra
Series II Data Logger has internal Memory Storage.
Note
During Autoprint operations, consider setting the instrument echo mode to
"OFF". Although Autoprint does operate when echo mode is "on", the
"OFF" setting prevents mixing of echoed command characters with
autoprinted data.
Autoprint can be controlled from the front panel or over the RS-232 interface. Setting up
storage into (and retrieving data from) memory in the Hydra Series II Data Logger can
be controlled either from the front panel or over the RS-232 interface. Refer to Chapter 3
for front panel operation. The stored data cannot be viewed from the front panel; data
must be requested through the RS-232 computer interface or listed on a printer.
Here are some rules to follow when using Autoprint and Memory Storage:
1. The RS-232 interface must be enabled before Autoprint can be enabled. (RS-232 is
always enabled on the Hydra Series II Data Logger.)
2. Since the instrument does not print over the IEEE-488 interface, Autoprint is
automatically turned off when you enable the IEEE-488 interface (Hydra Series II
Data Acquisition Unit only.)
3. If you have selected Memory Storage (Hydra Series II Data Logger only), verify that
the RS-232 interface is configured correctly before you upload the memory contents
to a PC or printer.
Autoprint: Computer Interface Control
Autoprint can be controlled from the front panel or over the RS-232 interface. Refer to
Chapter 3 for front panel operation.
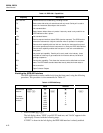
Through the RS-232 interface, the PRINT_TYPE command can be used to set up
Autoprint, and the PRINT command can be used to enable Autoprint. These commands
follow a structure paralleling the front panel procedure. PRINT_TYPE selects
destination (0 for Print Scans, 1 for Store Scans, or 2 for both) and type (0 for ALL, 1 for
ALAr, or 2 for trAnS.) PRINT sets printing on (1) or off (0).
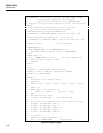
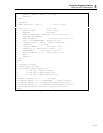
Autoprint: Output Format
The first line of an autoprint printout contains time and date values that identify when
the scan was started. Time values include Hour:Minute:Seconds, and date values include
Month/Year/Day. As an example, the following line is a valid start-of-scan time: