


9. Use the LC command to enter information for the IP address, host, subnet mask, gateway
parameters, and so on.
10. Enter XD -R -NC to reset the iLO 2 MP.
11. After the iLO 2 MP resets, log in to the iLO 2 MP again and enter CM at the MP> prompt.
12. To confirm that DHCP is disabled and display a list of updated LAN configuration settings,
enter the LS command.
Logging In to the iLO 2 MP
To log in to the iLO 2 MP, follow these steps:
1. Access the iLO 2 MP using the LAN, console serial port (RS-232), telnet, SSH, or web method.
The iLO 2 MP login prompt appears.
2. Log in using the default the iLO 2 MP user name and password (Admin/Admin).
TIP: For security reasons, HP strongly recommends you modify the default settings during
the initial login session. See “Modifying User Accounts and Default Passwords” (page 46).
Following is the MP Main Menu:
CO: Console
VFP: Virtual Front Panel
CM: Command Menu
CL: Console Logs
SL: Show Event Logs
SMCLP: Server Management Command Line Protocol
HE: Main Menu Help
X: Exit Connection
See Section : “Text User Interface” (page 59) for information on the iLO 2 MP menus and
commands.
TIP: When logging in using the local or remote console serial ports, the login prompt may not
display if another user is logged in through these ports. In this case, use Ctrl-B to access the MP
Main Menu and the MP> prompt.
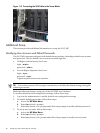
Physically Connecting the Server Blade to the iLO 2 MP
Use one of the following methods to connect the server blade to the iLO 2 MP:
• Connect to the iLO 2 MP with DHCP enabled. Use the Onboard Administrator iLO (OA/iLO)
network port on the rear of the enclosure. If the OA/iLO network port on the enclosure is
connected to the local network that has a DHCP server, your iLO 2 MP IP address is
automatically generated by the DHCP server. The server blade is factory set with DHCP
enabled.
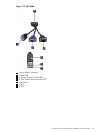
• Connect to the iLO 2 MP with no network connection. Use the console serial port on the
SUV cable. If the enclosure is not connected to any network, you must configure your server
through the console serial port (RS-232) on the SUV cable.
40 Setting Up and Connecting the Console