


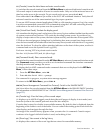
• Modify the MP subnet mask.
MP:CM> LC -s 192.0.2.1
• Modify the MP gateway address.
MP:CM> LC -g 192.0.2.1
• Set the link state to autonegotiate.
MP:CM> LC –link auto
• Set the link state to 10 BaseT.
MP:CM> LC –link t
• Set the remote console serial port address.
MP:CM> LC –web 2023
• Set the SSH console port address.
MP:CM> LC –ssh 22
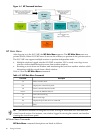
Configuring DNS
To use the DNS command to display and modify the DNS configuration, follow these steps:
1. From the MP Main Menu, enter command mode.
2. At the MP:CM> prompt, enter DNS. The screen appears current DNS data.
3. When prompted, enter A to select all parameters. The screen displays the current DHCP for
DNS servers status.
4. When prompted, enter Enabled or Disabled. The screen displays the current DHCP for
DNS domain name status.
5. When prompted, enter Enabled or Disabled. The screen displays the current register
with DDNS server value.
6. When prompted, enter Yes or No. The screen displays the current DNS domain name.
7. When prompted, enter a new value. The screen displays the primary DNS server IP address.
8. When prompted, enter a new value. The screen displays the optional secondary DNS server
IP address.
9. When prompted, enter a new value. The screen displays the optional tertiary DNS server
IP address.
10. When prompted, enter a new value.
The DNS configuration is updated as follows:
New DNS Configuration (* modified values):
* S - DHCP for DNS Servers : Disabled
* D - DHCP for DNS Domain Name : Disabled
R - Register with DDNS Server : Yes
* N - DNS Domain Name : mpdns.company.com
* 1 - Primary DNS Server IP : 192.0.2.1
2 - Secondary DNS Server IP :
3 - Tertiary DNS Server IP :
Enter parameter(s) to revise, Y to confirm, or [Q] to Quit: Y
-> DNS Configuration has been updated
[mpserver] MP:CM>
54 Configuring DHCP, DNS, LDAP, and LDAP Lite