


Configuring LDAP Extended Schema
The following procedure shows how to configure the iLO 2 MP to use a directory server to
authenticate a user login using the iLO 2 MP TUI.
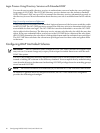
NOTE: The LDAP connection times out after 30 minutes of inactivity in Active Directory. For
Novell directory, there is no inactivity timeout.
To configure using the web interface, see “Group Accounts” (page 112).
NOTE: The LDAP feature is only available if you have the iLO 2 Advanced Pack license.
To configure LDAP extended schema, follow these steps:
1. From the MP Main Menu, enter command mode.
2. At the MP:CM> prompt, enter LDAP.
3. To select Directory Settings, enter D. The current LDAP directory settings appear.
4. To select all parameters enter A. The current LDAP directory authentication status appears.
The local iLO 2 MP user accounts database status also appears. If enabled, the local iLO 2
MP user database is used if there is an authentication failure using the LDAP Directory.
5. Enter D for disabled, or E for enabled. You must enter E if LDAP directory authentication
is disabled. The current LDAP server IP address appears.
6. Enter the IP address of the LDAP server. The current LDAP server port address appears.
7. Enter a new port number. The screen displays the current object distinguished name. This
specifies the full distinguished name of the iLO 2 MP device object in the directory service.
For example, CN=RILOE2OBJECT, CN=Users, DC=HP, DC=com. Distinguished names
are limited to 255 characters maximum plus one for the NULL terminator character.
8. Enter a new name. The Current User Search Context 1 appears.
9. Enter a new search setting. The Current User Search Context 2 appears.
NOTE: The context settings 1, 2, and 3 point to areas in the directory service where users
are located, so that users do not have to enter the complete tree structure when logging in.
For example, CN=Users, DC=HP, DC=com. Directory user contexts are limited to 127
characters maximum plus one for the NULL terminator character for each directory user
context.
10. Enter a new search setting. The screen displays the Current User Search Context 3.
11. When prompted, enter a new search setting.
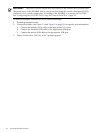
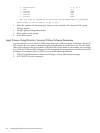
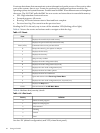
Following is the updated LDAP configuration:
New Directory Configuration (* modified values):
* L - LDAP Directory Authentication : Enabled
M - Local MP User database : Enabled
* I - Directory Server IP Address : 192.0.2.1
P - Directory Server LDAP Port : 636
D - Distinguished Name (DN) : cn=mp,o=demo
1 - User Search Context 1 : o=mp
2 - User Search Context 2 : o=demo
3 - User Search Context 3 : o=test
Enter Parameter(s) to revise, Y to confirm, or [Q] to Quit: y
-> LDAP Configuration has been updated
Configuring LDAP Extended Schema 55