


System
Board
1.
Prepare the computer for disassembly (Preparation for Disassembly on page 22).
2.
When replacing the system board, make sure the following components are removed from the
defective system board and installed on the replacement system board:
● Memory modules (Installing Additional Memory on page25)
3.
Remove the access panel (Access Panel on page 23).
4.
Remove the front bezel (Front Bezel on page 24).
5.
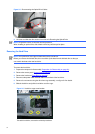
Disconnect all data and power cables from the system board.
6.
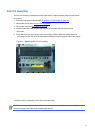
Disconnect the ODD/HDD drive power & data cables from the system board
7.
Disconnect the balance of the cables from the system board.
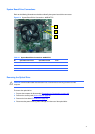
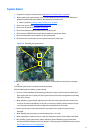
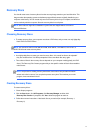
8.
Remove the four screws that secure the system board to the chassis
(1)
.
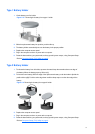
Figure
5-9
Removing the system board
9.
Slide the system board toward the front of the chassis, and then lift the board out of the computer
(2)
.
To install the system board, reverse the removal procedure.
Note the following when installing a system board:
● To insure correct installation while fastening the first two screws, press the system board firmly in
place against the rear I/O panel so that the system board screw holes are aligned to the mounting
holes in the chassis.
● When installing a system board, align the ports on the rear of the system board to cutouts in the
rear of the chassis (keep EMI tabs on top of the connectors), and firmly slide toward the chassis
rear until system board screw holes are aligned to mounting holes in the chassis.
● Ensure ground fingers make contact with the connectors on the system board and are not
damaged.
● When installing the system board, recommended torque = 4-6 in-lbs.
● When replacing the system board, you must also change the chassis serial number in the BIOS.
● After installing a new system board, always update the system ROM to ensure that the latest
version of the BIOS is being used on the computer. The latest system ROM BIOS can be found at:
http:\\h18000.www1.hp.com/support/files.
35
1
2