


hp officejet 4200 series
chapter 6
72
print
Macintosh users
To specify a document's paper size, scaling, and orientation, use the Page Setup
dialog box. To specify other print settings for a document, and to send the
document to the printer, use the Print dialog box.
Note: The following steps are specific to OS X. For OS 9, the steps might be
slightly different. Be sure to select the HP Officejet in the Print Center (OS X)
or in the Chooser (OS 9) before you begin printing.
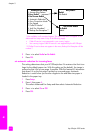
1 From your software application’s File menu, select Page Setup.
The Page Setup dialog box appears.
2 In the Format for pull-down menu, select the HP Officejet.
3 Change other settings as needed:
– Select the paper size. (To set a custom paper size, select Custom Paper
Size from the Settings pull-down menu.)
– Select the orientation.
– Enter the scaling percentage.
For OS 9, the Page Setup dialog box includes options to rotate or mirror
the image, and to edit custom paper sizes.
4 Click OK.
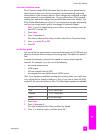
5 From your software application’s File menu, select Print.
The Print dialog box appears.
If you are using OS X, the Copies & Pages panel opens. If you are using
OS 9, the General panel opens.
6 Select the print settings appropriate for your project.
Use the pull-down menus to access the other panels.
7 Click Print to begin printing.
set printing options
You can customize the print settings of the HP Officejet to handle nearly any print
task including customized, high-quality photos and documents.
Windows users
If you want to change print settings, you need to decide if you want to change
them for the current job, or for all jobs. How you display print settings depends
on whether or not you want to make the setting permanent.
to change the print settings for all future jobs
1 In the HP Director, click Settings, and then select Printer Settings.
2 Make changes to the print settings, and click OK.