


2-26 Removal and Replacement HP Omnibook 500
4.
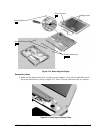
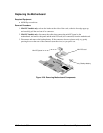
Disconnect the speaker wires from the motherboard. If the connector does not release easily, try
gently pressing down on the rear of the connector (near the wires) as you pull it out.
5.
Remove the right-rear screw (nearest the speaker) from the hard drive/LED flex cable, then
disconnect the cable from the motherboard.
6.
Remove both standoff screws from the back of the unit.
7.
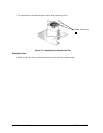
Remove the four screws from the motherboard (each marked by a white arrow on the
motherboard).
8.
Certain models only:
remove the screw attaching the EMI plate to the bottom case, and remove
the EMI plate.
9.
Lift the motherboard out of the bottom case.
See “Replacing the Motherboard” on page 2-27 or “Replacing the Bottom Case” on page 2-29 for
additional procedures.
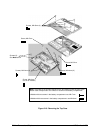
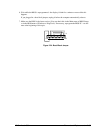
Figure 2-19. Removing the Motherboard
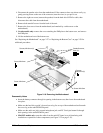
Reassembly Notes
•
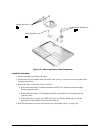
Insert the battery connector through its opening in the bottom case, then lower the motherboard
into place.
•
Make sure the hard drive guide’s forward screw lug lies on top of the motherboard and beneath
the screw lug on the audio/PCMCIA panel.
•
Make sure the audio-out jack, external microphone jack, and PC Card eject button fit through
their openings in the audio/PCMCIA panel.
•
Mini-PCI models only:
route the cables from the mini-PCI panel to avoid interfering with
installation or operation of other components (see Figure 2-12 on page 2-15).
Screws, M2×3mm (4)
Screw, M2×3mm
Screws,
M2×2mm (2)
Standoff screws,
5mm (2)
Screw, M2×5mm
Screw, M2×2mm