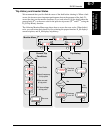
SJ100 Inverter
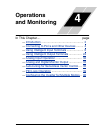
Operations
and Monitoring
4–35
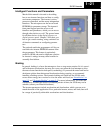
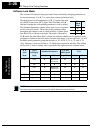
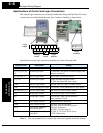
Auto-tuning for Sensorless Vector Control
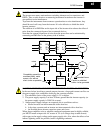
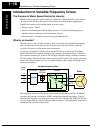
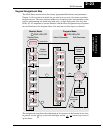
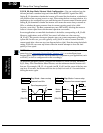
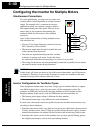
The SJ100 inverter has a built-in auto-tuning algorithm. Its purpose is to detect and
record the motor parameters to use in sensorless vector control. As you may recall from
Chapter 3, sensorless vector control (SLV) is the more sophisticated control algorithm
the SJ100 inverter can use to deliver higher torque levels at different speeds. Using
parameter A_44, you can select from the following:
• 00 = Variable frequency with constant torque
• 01 = Variable frequency with reduced torque
• 02 = Sensorless vector control (SLV)
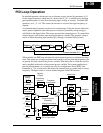
NOTE: Although “auto-tuning” is often associated with PID loops, the PID loop in the
SJ100 inverter is not directly affected by the auto-tuning procedure or parameters.
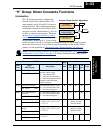
Most of the “H” Group parameters are dedicated to storing SLV parameters. The inverter
comes from the factory with default settings for these parameters. To benefit fully from
SLV control, you must use A_44 to select SLV control, and initiate the auto-tuning
calibration procedure as described below for your motor. During the procedure, the
inverter will write new values for the “H” Group settings related to SLV control. The
settings have a second set of parameters for a second motor. The factory default configu-
ration will apply auto-tuning to the first motor.
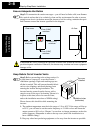
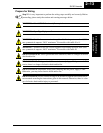
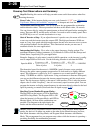
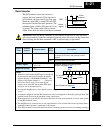
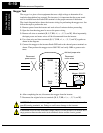
WARNING: You may need to disconnect the load from the motor before performing
auto-tuning. The inverter runs the motor forward and backward for several seconds
without regard to load movement limits.
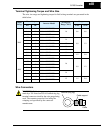
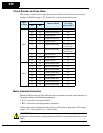
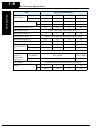
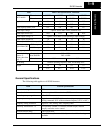
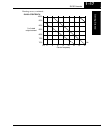
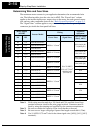
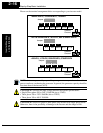
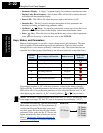
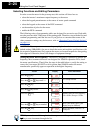
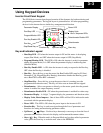
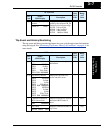
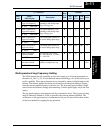
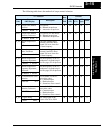
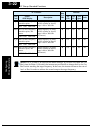
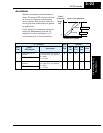
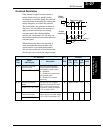
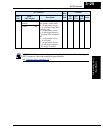
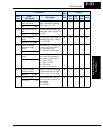
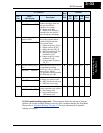
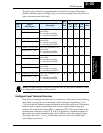
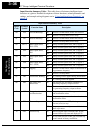
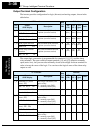
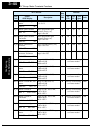
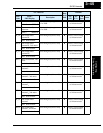
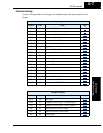
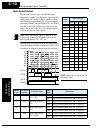
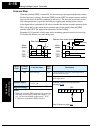
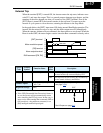
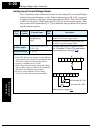
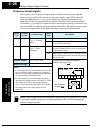
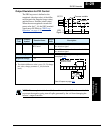
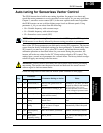
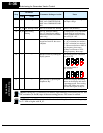
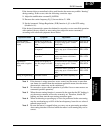
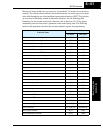
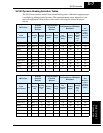
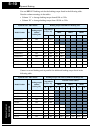
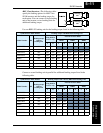
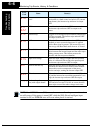
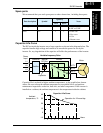
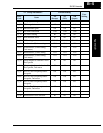
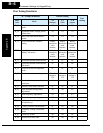
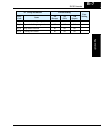
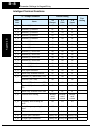
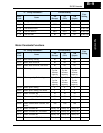
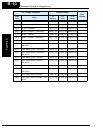
Follow the steps below to auto-tune the inverter (table continued on next page):
Step
Parameter
Parameter Setting or Action Notes
Code Name
1 F_02 Acceleration (1) Set to a time greater than 10
seconds
Parameters F_02 and F_03 must
be equal in order for the moment
of inertia data to be correct.
Increase the time if over-current
or over-voltage trip event occurs.
2 F_03 Deceleration (1) Set the same as setting F_02
3 H_03 Motor capacity Varies with inverter (default
value will be correct)
Setting is in kW
4 H_04 Motor poles
setting
Set the poles 2 / 4 / 6 / 8 to
match motor
Refer to the motor specifications
label
5 A_01 Frequency source
setting
Set = 02 (selects parameter
F_01 as source of output
frequency)
The auto-tuning procedure will
automatically control the speed
6 A_03 Base frequency
setting
Set = 50 or 60 for your motor Default= 50 (Europe) / 60(US)
7 A_20 Multi-speed
frequency setting
Set A_20 > 0 If A_20 = 0, auto-tuning is not
performed