


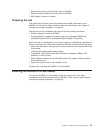

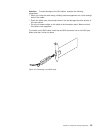

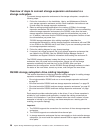
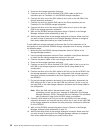

To remove a mini-SAS cable, complete the following steps:
1. Put one finger into the hole on the blue plastic tab on the mini-SAS connector
and gently pull on the tab to release the locking mechanism.
2. As you pull on the tab, pull out the connector to remove it from the port.
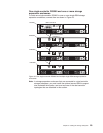
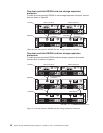
Connecting storage expansion enclosures to the DS3200
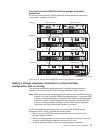
Attention
Before you power-on the storage subsystem, it must contain at least four
drives. If at least four drives are not installed in each attached storage
expansion enclosure and in the DS3200 storage subsystem, when you
power-on the DS3200 and its attached storage expansion enclosures, your
standard storage partition key might be lost and must be regenerated, using
instructions at http://www.ibm.com/storage/fasttkeys/.
In addition, the resulting insufficient load to the enclosure power supplies
might cause them to intermittently appear to have failed, falsely indicating that
the power supplies are bad. All drives in the DS3200 storage subsystem and
the connected storage expansion enclosure or enclosures must contain no
prior configuration data.
In the initial installation of the DS3200, you can add only new storage expansion
enclosures to the DS3200 storage subsystem. This means that there must be no
existing configuration information about the storage expansion enclosures that you
want to install.
Note: In this document, EXP3000 storage expansion enclosures are used as
examples in text and illustrations.
If the storage expansion enclosures that you want to install currently contain logical
drives or configured hot spares and you want them to be part of the DS3200
storage subsystem configuration, see the IBM DS3000 Storage Manager Version 2
Installation and Support Guide, which is in the Documentation folder on the IBM
Blue plastic tab
Figure 17. Removing a mini-SAS cable
26 System Storage DS3200 Storage Subsystem: Installation, User’s, and Maintenance Guide