


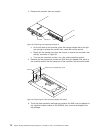
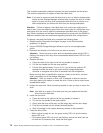

8. Make sure that the drive is shown in the DS3000 Storage Manager Subsystem
Management window.
Note: If you are replacing more than one hard disk drive, replace only one drive at
a time.
Replacing multiple drives
This section provides guidelines for upgrading the drives in the storage subsystem.
Read the software documentation and this entire section to determine whether you
should use this procedure, use a modified version of this procedure, or use a
different procedure that is provided by the operating system.
Notes:
1. Instructions that are provided with the software supersede any instructions and
information in this document.
2. Use Table 9 on page 110 to make sure that you replace the hard disk drives into
the correct bays.
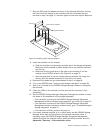
Attention: After you remove a drive, wait 70 seconds to allow the drive to spin
down before you replace or reseat the drive. Failure to do so might cause
unpredictable results.
There are two methods for upgrading drives:
v Replacing all the drives at the same time
This method requires that you back up the data on the affected drives and then
turn off the DS3200 storage subsystem.
Attention: Turn off the DS3200 storage subsystem before you turn off the
attached storage expansion enclosures.
After you replace all the drives, you must reconfigure the new drives and restore
data from backup. See the procedure in “Replacing all drives at the same time”
on page 78.
This is the safest way to exchange drives without losing data. However, this
method might take a long time to complete because of the backup,
reconfiguration, and restoration processes. In addition, other users are not able
to use the storage subsystem (or any storage expansion enclosures attached to
the storage subsystem) until you finish the procedure. You must use this method
on RAID 0 logical drives.
v Replacing the drives one at a time
In this method, you manually fail each drive, replace it, and wait for the system to
restore data to the new drive before you install the next drive. After you install the
new drives, you can configure them to make the additional drive space available.
See the procedure in “Replacing the drives one at a time” on page 80.
Using this method, you can replace the drives while the storage expansion
enclosures and the DS3200 are running, eliminating the downtime that is
required if you replace all the drives at once. However, this method is more risky
because you can lose data if the drive restoration or storage subsystem
reconfiguration process fails. In addition, the reconstruction process might take a
long time. This method works only on redundant logical drives (RAID 1, 3, or 5).
You cannot use this method with any drives that contains RAID 0 logical drives.
Consider backing up your data if you use this method. This safeguards your data
if the restoration and reconfiguration process fails or the new drive malfunctions.
The method that you use depends on the following considerations:
Chapter 5. Replacing components 77