


Installing a hard disk drive
Except during the DS3200 storage subsystem initial power-on, you can add hard
disk drives while the storage subsystem is turned on and running. To install
hot-swap hard disk drives in the storage subsystem, complete the following steps.
Attention: After you remove a drive, wait 70 seconds to allow the drive to spin
down before you replace or reseat the drive. Failure to do so might cause
unpredictable results.
Note: The hard disk drive comes with a tray already attached. Do not attempt to
detach the drive from the tray.
1. Read the safety information that begins on page xi and “Best practices
guidelines” on page 6.
2. Read the documentation that comes with the hard disk drive.
3. Remove the filler panel from the bay in which you will install the drive. Save the
filler panel for later use.
4. Unpack the new drive. Save all packing material in case you have to return the
drive.
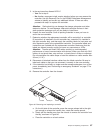
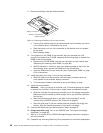
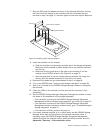
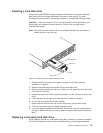
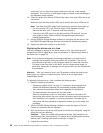
5. Press the latch on the right end of the drive tray handle to release it.
6. Pull out the tray handle to the open position.
7. Gently slide the drive all the way into the empty bay until the drive stops.
8. Push the tray handle into the closed (latched) position.
9. If you are installing additional drives, wait 30 seconds, and then repeat steps 5
through 8. Make sure that you wait at least 30 seconds before you install each
drive.
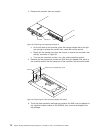
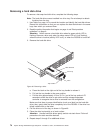
Replacing a hot-swap hard disk drive
Drive problems include any malfunctions that delay, interrupt, or prevent successful
I/O activity between the hosts and the hard disk drives in the storage subsystem.
Drive tray
Tray handle
Latch
Hard disk drive
Sys
t
em
S
torage
Figure 47. Installing and removing a hard disk drive
Chapter 5. Replacing components 75