


Chapter 5. Installing options 53
— The green light flashes slowly (one flash per second), the drive is being
rebuilt.
— The green light flashes rapidly (three flashes per second), the controller is
identifying the drive.
Memory
Adding memory to the server is an easy way to improve system performance. You
can increase the amount of memory in the server by installing options called memory-
module kits. Each kit contains one industry-standard, dual-inline memory module
(DIMM). Your server uses a noninterleaved memory configuration, which allows you
to add, remove, or replace one DIMM at a time. In an interleaved system you would
have to add, remove, or replace memory in sets.
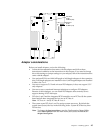
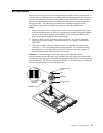
The server comes with a dual inline memory module (DIMM) installed on the system
board in DIMM slot 1.
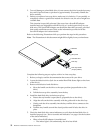
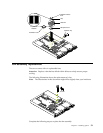
Note: Install additional DIMMs in the following order: DIMM connector 2, then 3,
then 4. (See the following illustration for memory connector locations.)
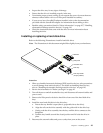
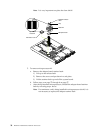
Installing memory modules
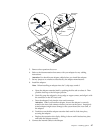
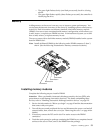
Complete the following steps to install a DIMM:
Attention: When you handle electrostatic discharge-sensitive devices (ESD), take
precautions to avoid damage from static electricity. For details on handling these
devices, refer to “Handling electrostatic discharge-sensitive devices” on page 110.
1. Review the information in “Before you begin” on page 42 and the documentation
that comes with your option.
2. Turn off the server and peripheral devices and disconnect the power cord and all
external cables; then, remove the cover (see “Removing the cover” on page 44 for
details).
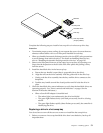
3. If necessary, remove the PCI card in slot 2 for easier access to the DIMM
connectors.
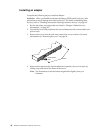
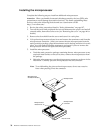
4. Touch the static-protective package containing the DIMM to any unpainted metal
surface on the server. Then, remove the DIMM from the package.
Connector 1
Connector 2
Connector 3
Connector 4