Hardware Installations and Upgrades
58
Replacing the Power Distribution Board
The power distribution board is located between the two power supplies. This board can be
replaced if it fails. To replace the power distribution board, use the following instructions.
1. Observe the safety and ESD precautions at the beginning of this book. See “Safety
Information.”
2. Power down the server and unplug all peripheral devices and the AC power cable(s).
3. Remove the chassis cover. For instructions, see “Removing the Chassis Cover.”
4. Remove the power supply air duct. For instructions see “Removing the Power Supply Air
Duct”.
5. Remove the power supply modules. For instructions see “Removing a Hot-Swap Power
Supply”.
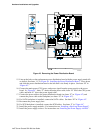
6. Disconnect the main power, CPU power and power signal cables from the server board. In
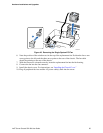
“Figure 43. Removing the Power Distribution Board”, letter “A” shows the main power cable,
letter “B” shows the CPU power cable, and letter “C” shows the power signal cable.
7. Disconnect the PCI fan. See letter “D” in “Figure 43”.
8. Disconnect the power from the power distribution board (see letter “E” in “Figure 43”) and the
backplane (see letter “F” in “Figure 43”).
9. If a SATA backplane is installed, disconnect the SATA cables from the backplane. See letter
“G” in “Figure 43”).
10. If a SCSI backplane is installed, disconnect the SCSI cables from the backplane. See letter “H”
in “Figure 43”).
11. Disconnect the power supply fans (see letters “P” and “Q” in “Figure 43”).
12. If a slimline DVD/CD-ROM or floppy is installed, disconnect the power (see letter “I” in
“Figure 43”) and data cable (see letter “J” in “Figure 43”).
13. Slide the power distribution board to the right to release the board. See letter “K” in “Figure
43”.
14. Lift the power distribution board from the chassis. See letter “L” in “Figure 43”.


