


DLA-G150CLU
DLA-G150CLE
1-46
No.51931
10
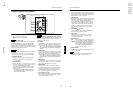
Controls and Features
9
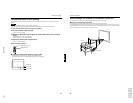
EXIT button
This button will be used in the menu mode to return to the
previous menu. When the main menu is displayed, this
button will cause the menu to disappear. For details, refer
to “Basic Menu Operation” on page 43.
p
PRESET button
This PRESET button only works as a reset button for the
direct button adjustment of the KEYSTONE button of the
control panel and the DIGITAL ZOOM button of the
remote control. When adjusting the keystone or digital
zoom (when the setting is displayed on the screen) the
adjusted value is reset to that which was set when the
projector was shipped from the factory. Of the menu
items, this button only works for the keystone setting
screen.
q
KEYSTONE / buttons
Use these buttons to correct a trapezoidal distortion of
the projected image. (Refer to page 35.)
w
HIDE button
Use this button to turn off the image on the screen
temporarily. Pressing it again restores the image to
resume. (Refer to page 35.)
e
LAMP indicator
ON : After the light-source lamp has been used for
more than approx. 900 hours. (NORMAL only)
Blinking
: After the light-source lamp has been used for
more than approx. 1000 hours (1900 hours in the
LPC or LOC mode). Replace the light-source
lamp. Refer to “Replacing the Light-Source
Lamp” on page 58 or page 59.
r
TEMP indicator
Blinking : The temperature inside the projector has risen
abnormally.
Note
• While the TEMP indicator is blinking (during abnormal
temperature), the power is automatically cut off.
9
Controls and Features
ENGLISHDEUTSHFRANÇAISITALIANOESPAÑOL
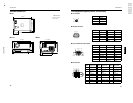
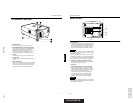
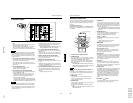
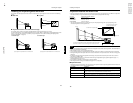
Control Panel on the Projector
1
STAND BY Indicator
ON : When in stand-by mode.
Blinking :When in cool-down mode.
Memo
About the cool-down mode:
This projector has a function to cool down the heated lamp for a
fixed period of time (approx. 120 seconds) after projection is
finished. This feature is referred to as the cool-down mode.
The purpose of the cool-down mode is to prevent inner parts
from being deformed or broken by heat from the heated lamp
as well as to prolong the life of the lamp.
CAUTIONS
• Do not turn off the MAIN POWER switch while in the cool-
down mode.
• Do not place the projector on its side or stand it upright
while in the cool-down mode; this may block the vents.
2 OPERATE indicator
ON : When the projector is in operation (projecting).
OFF : When the projector is not in operation (not
projecting).
3
OPERATE button
When the projector is in the stand-by mode, press this
button one second or more, and the projector is turned
on, causing the OPERATE indicator to light.
Press it one second or more again, and the projector
goes into the cool-down mode, then stand-by mode.
(Refer to page 32.)
* You cannot use the OPERATE button for about one
minute after the lamp blinks. Press the button after a
minute or longer has elapsed.
Memo
While in the cool-down mode (STAND BY indicator is blinking):
Even if you press the OPERATE button, the projector is not
turned on. Wait until the projector enters stand-by mode
(STAND BY indicator stays lit).
4 PC button
Use this button to select a device connected to the PC 1,
PC 2 or DVI terminals. Each time you press the button,
the selection alternates among PC 1, PC 2 and DVI.
* “PC1” , “PC2” or “DVI” will be displayed on the top right of
the projected image. (This function can be disabled by
the menu.)
5 VIDEO button
Use this button to select a device such as a video deck
connected to the AV IN (Y/C, VIDEO or COMP) terminal
of the projector. Each time you press the button, the
selection alternates among Y/C, VIDEO and COMP.
* “Y/C”, “VIDEO” or “COMP” will be displayed on the top right of
the projected image. (This function can be disabled by the
menu.)
6
MENU button
Use this button to enter or exit the menu mode. The main
menu appears or disappears at the screen. For details,
refer to “Basic Menu Operation” on page 43.
7 ENTER button
This button will be used in the menu mode. Use to
display the hierarchical menus. Also use when “ENTER”
is displayed against the item on the menu screen or
when the “All reset” selection is confirmed. For details,
refer to “Basic Menu Operation” on page 43.
8
Cursor buttons
5
/
∞
/
2
/
3
These buttons will be used in the menu mode to select an
item, or to set or adjust the value. For details, refer to
“Basic Menu Operation” on page 43.
V
I
D
E
O
P
C
L
A
M
P
T
E
M
P
S
T
A
N
D
B
Y
M
E
N
U
K
E
Y
S
T
O
N
E
P
R
E
S
E
T
E
X
I
T
E
N
T
E
R
O
P
E
R
A
T
E
H
I
D
E
D
O
W
N
U
P
3
4
5
6
7
2
1
r
w
q
p
9
8
e
LAMP TEMP
STAND BY
HIDE
PC
VIDEO
MENU
KEYSTONE
PRESET
EXIT ENTER
OPERATE