


DLA-G150CLU
DLA-G150CLE
1-72
No.51931
62
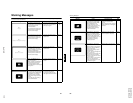
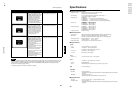
Replacing the Light-Source Lamp
■ Resetting the Lamp Use Time
After replacing with a new light-source lamp, reset the lamp-time counter inside the projector to clear the accumulated lamp
time to zero (0). After resetting, a new count will start for the new light-source lamp.
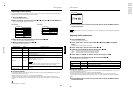
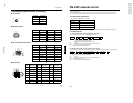
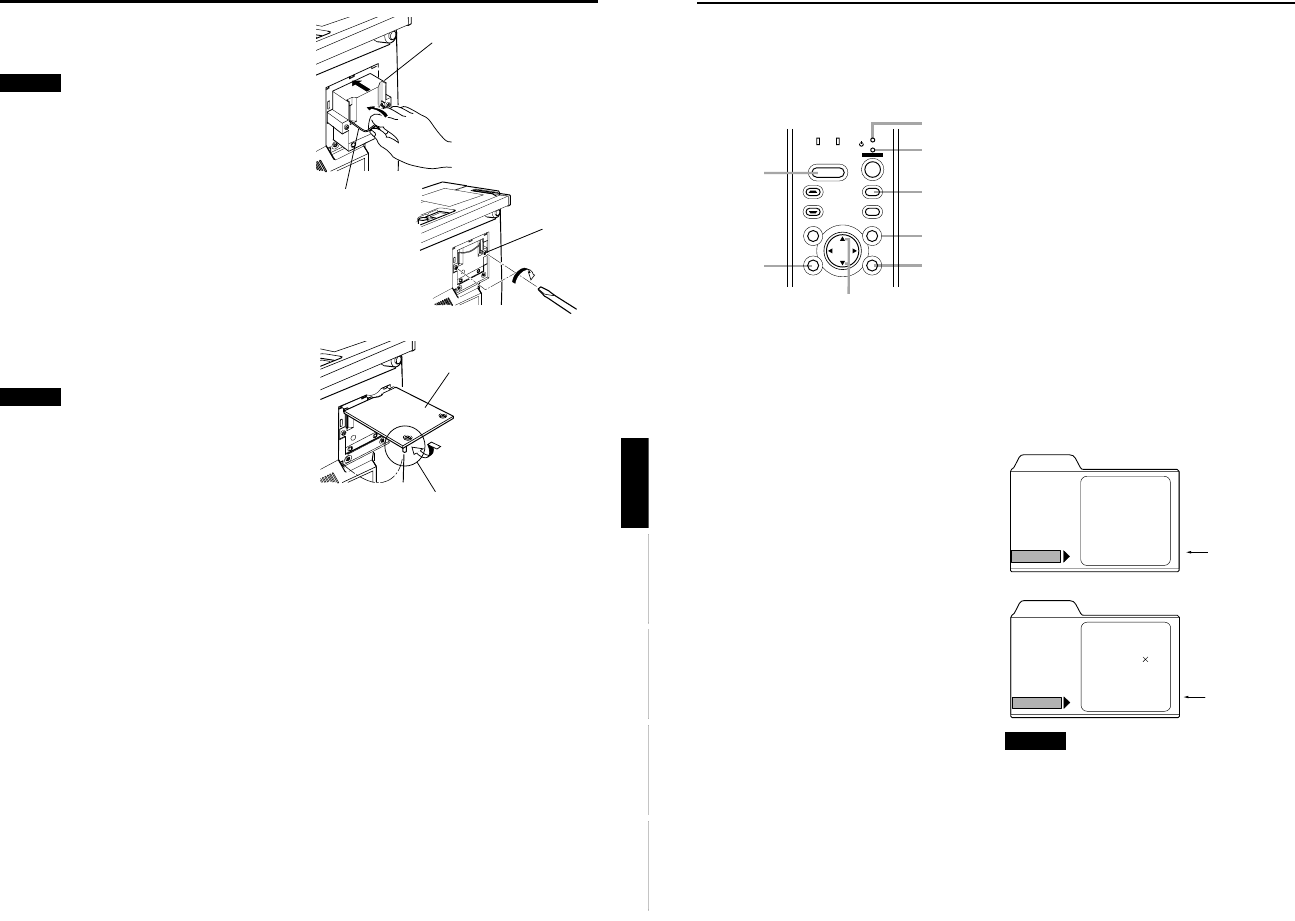
■ Projector’s button
1
Turn on the MAIN POWER switch to go
into stand-by mode.
In stand-by mode, the STAND BY indicator on the
projector lights up.
2
Press the following buttons on the
projector, sequentially.
1
Momentary press the PC button.
2
Momentary press the ENTER button.
3
Momentary press the EXIT button.
4
Press and hold the HIDE button for two seconds
or more.
* During this sequence, the STAND BY and OPERATE
indicators alternately blink about every approx. 3 seconds.
After completion of the sequence, the STAND BY indicator
alone stays on.
* Buttons must be pressed within 2 seconds of the previous
button.
* When you make a mistake in button operations, return to
the beginning of the sequence.
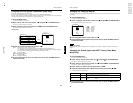
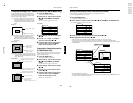
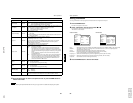
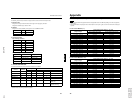
* To check the lamp time on the menu, press the MENU button
and select “Information” with the cursor button
5
or
∞
.
The lamp use time is indicated in the item “Lamp time”.
Video main menu
PC main menu
CAUTION
• Reset the lamp use time only when you have replaced with
a new light-source lamp. Never reset it during lamp life,
otherwise the replacement time may become unclear, and
lead to degraded performance or lamp explosion.
LAMP TEMP
STAND BY
HIDE
PC
VIDEO
MENU
KEYSTONE
PRESET
EXIT ENTER
OPERATE
Cursor buttons 5/∞
1
PC
button
2
ENTER
button
3
EXIT
button
4
HIDE
button
STAND BY
indicator
MENU
button
OPERATE
indicator
Menu
Input
Switcher
Source
Lamp time
VIDEO
CH.0
NTSC
123 h
Image adj.
Setting
Color temp.
Options
Language
Information
Lamp time (0 h)
Menu
Input
Switcher
Resolution
Frequency H
Frequency V
Lamp time
PC 1
CH.0
1280 1024
79.9
75
123
kHz
Hz
h
Image adj.
Setting
Color temp.
Options
Language
Information
Lamp time (0 h)
61
Replacing the Light-Source Lamp
ENGLISHDEUTSHFRANÇAISITALIANOESPAÑOL
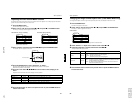
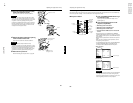
3
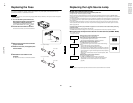
Insert the new light-source lamp fully
inside and fasten the screws.
Fasten the two screws with a flat-end screwdriver.
CAUTION
• Do not touch the glass surface of the light-source lamp
directly with your hand as well as staining it. If you touch
with a bare hand, oils and other substances on your hand
may adhere to the lamp, possibly preventing it from
performing as specified and therefore giving a shortened
lamp life, a darkened screen, etc. To handle a new light-
source lamp, hold it by the plastic part. Never touch the
metal part or the front glass surface.
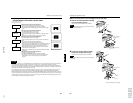
4
Replace the lamp-replacement opening
cover and fasten the screws.
Fasten the two screws with a flat-end screwdriver.
CAUTIONS
• Install the light-source lamp and close the lamp-
replacement opening cover correctly; otherwise, a safety
switch is activated to prevent the projector from operating.
• If the claw on the lamp-replacement opening cover is
damaged, the projector may not possibly operate. Then,
replace with a new lamp-replacement opening cover.
5
Reset the lamp use time.
Perform “Resetting the Lamp Use Time” on page 62.
Screw
Light-source lamp
Handle
Lamp-replacement
opening cover
Be careful not to
damage the claw.