DLA-G150CLU
DLA-G150CLE
1-60
No.51931
38
Menu Operations
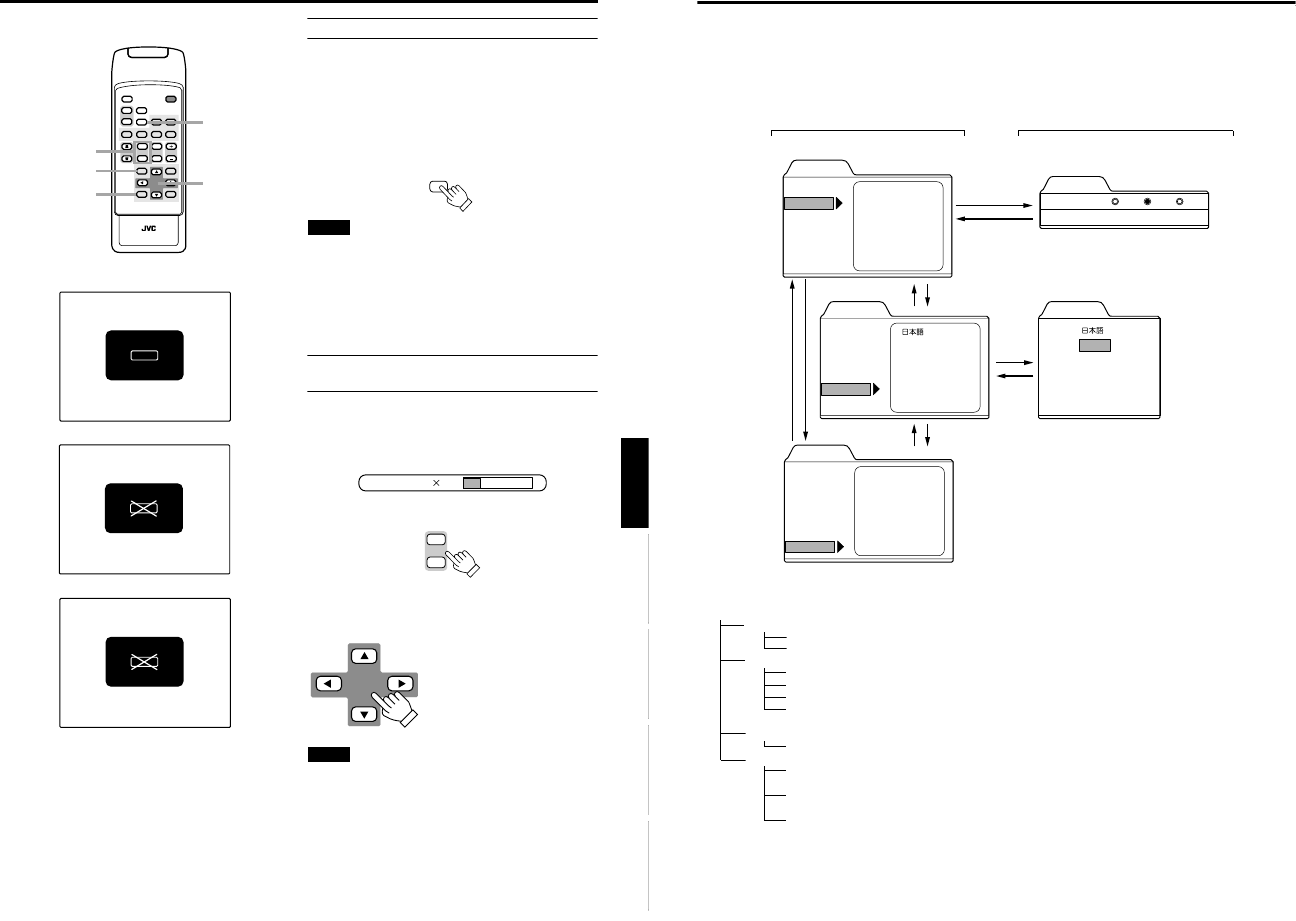
You can adjust picture quality, set functions, get information on the input video signal, etc. using the menus. From the
following menu transition diagrams, you can see the overall menus and basic button operation in menu mode. Note that there
are three menu modes, No signal menu mode, video menu mode and PC menu mode. When the MENU button is pressed,
the projector enters one of these modes by judging the input signal being received.
■ Menu Transition Diagram in No signal Menu Mode
This is displayed if there is no signal from the selected input terminal.
■ Quick Reference Guide for No signal Menu Mode
Main Menu in No signal Menu Mode
Set up
Sync level: Low. Std*. High.
Sync timing: 3-5
Options
Flip H: OFF* / ON (Select for upside-down hanging on the ceiling.)
Flip V: OFF* / ON (Select for upside-down hanging on the ceiling.)
RS-232C [bps]: Selectable baud rate (transmission speed). 9600 / 19200*
Sleep time [min]: Selectable sleep times. If no-signal condition continues for the period of selected time
(Unit: Minutes), the projector enters the stand-by mode. 15 / 30 / 60 / OFF*
Language Language for on-screen display.
Japanese / English* / German / Spanish / Italian / French
Information
Input: Shows the terminal name selected by the VIDEO or PC button. (Y/C, VIDEO, COMP,
PC1, PC2 or DVI)
Switcher: Has no meaning. This display currently has no meaning. (“CH.0” is usually displayed to
indicate that it is not being used.)
Lamp time: Accumulated used hours of the light-source lamp.
Menu
Set up
Options
Language
Information
English
Deutsch
Español
Italiano
Français
Menu
Set up
Options
Language
Information
Input
Switcher
Lamp time
PC1
CH.0
123 h
Language
Set up
Sync level
Sync timing
StdLow High
English
Deutsch
Español
Italiano
Français
Menu
Set up
Options
Language
Information
Sync level
Sync timing
Main menu in No signal Menu Mode Submenus in No signal Menu Mode
Press 5/∞ to select an item.
Press 5/∞ to select an item.
Press 2/3 to set the value.
Press 5/∞ to select an item.
3 or ENTER
EXIT
3 or
ENTER
∞
5
∞
5
∞
5
EXIT
37
Basic Operations
ENGLISHDEUTSHFRANÇAISITALIANOESPAÑOL
■ Remote control unit
FREEZE message
FREEZE inhibit message
DIGITAL ZOOM inhibit message
Displaying a Still Picture (FREEZE)
While projecting an image, a still picture is obtained at any
time by using the FREEZE button on the remote control.
When you press the FREEZE button:
“FREEZE” appears on the screen for a few seconds and
then the still picture is shown on the screen. Refer to the
FREEZE message shown on the left of this page.
* To forcibly clear “FREEZE”, press the EXIT button.
When you press the FREEZE button again.
The original image resumes.
Notes
• During freezing, the picture sent from the signal source is
lost.
• If any of the inoperative buttons (“MENU”, “QUICK ALIGN.”,
“KEYSTONE”) are pressed while displaying a still picture,
“FREEZE” is displayed on the screen.
• This function will not work with some signal sources
(UXGA, etc). In this case, the FREEZE inhibit message
appears for a few seconds, as shown on the left. To forcibly
clear this message, press the EXIT button.
Zooming a Part of the Image
(DIGITAL ZOOM T/W)
A part of the image being projected can be digitally magnified up
to four times. When the DIGITAL ZOOM T or W button is
pressed, “Digital zoom” appears on the screen together with the
level bar and magnifying power (
×
1.0,
×
1.2,
×
1.4,
×
1.6,
×
2.0,
×
2.5,
×
3.2,
×
4.0).
When “15 sec.” is displayed in the menu,
“Digital zoom” will appear in approximately 15 seconds.
• To zoom up or zoom down, press the DIGITAL ZOOM T or
W button on the remote control.
Moving the zoomed image:
While “Digital zoom” appears on the screen, you can move
the zoomed image with the cursor (5/∞/2/3) button on the
remote control.
5: Upper part of the image will be
displayed.
∞: Lower part of the image will be
displayed.
2: Left side part of the image will
be displayed.
3: Right side part of the image
will be displayed.
Notes
• This function will not work with some signal sources
(UXGA, etc). In this case, the DIGITAL ZOOM inhibit
message appears for a few seconds, as shown on the left.
To forcibly clear this message, press the EXIT button.
• The quality of the zoomed image reduces in comparison
with the original one.
• To return to the original size (
×
1.0) and original position,
press the PRESET button while “Digital zoom” is displayed
on the screen.
DVI
VIDEO
COMP
QUICK
ALIGN.
PC1 PC2
Y/C
HIDE
PRESET
ENTEREXIT
MENU
FREEZE
SCREEN
OPERATE
DIGITAL
ZOOM
ZOOM FOCUS
W
W
S
T
W
T
RM-M160 REMOTE CONTROL UNIT
SCREEN
KEYSTONE
W
S
FREEZE button
PRESET button
EXIT button
DIGITAL ZOOM
T/W button
Cursor buttons
5/∞ / 2/3
FREEZE
FREEZE
D.ZOOM
FREEZE
Remote control unit
Digital zoom 1.2
DIGITAL
ZOOM
W
T
Remote control unit


