DLA-G150CLU
DLA-G150CLE
1-68
No.51931
54
Menu Operations
Setting and Adjusting Other Functions (OPTIONS)
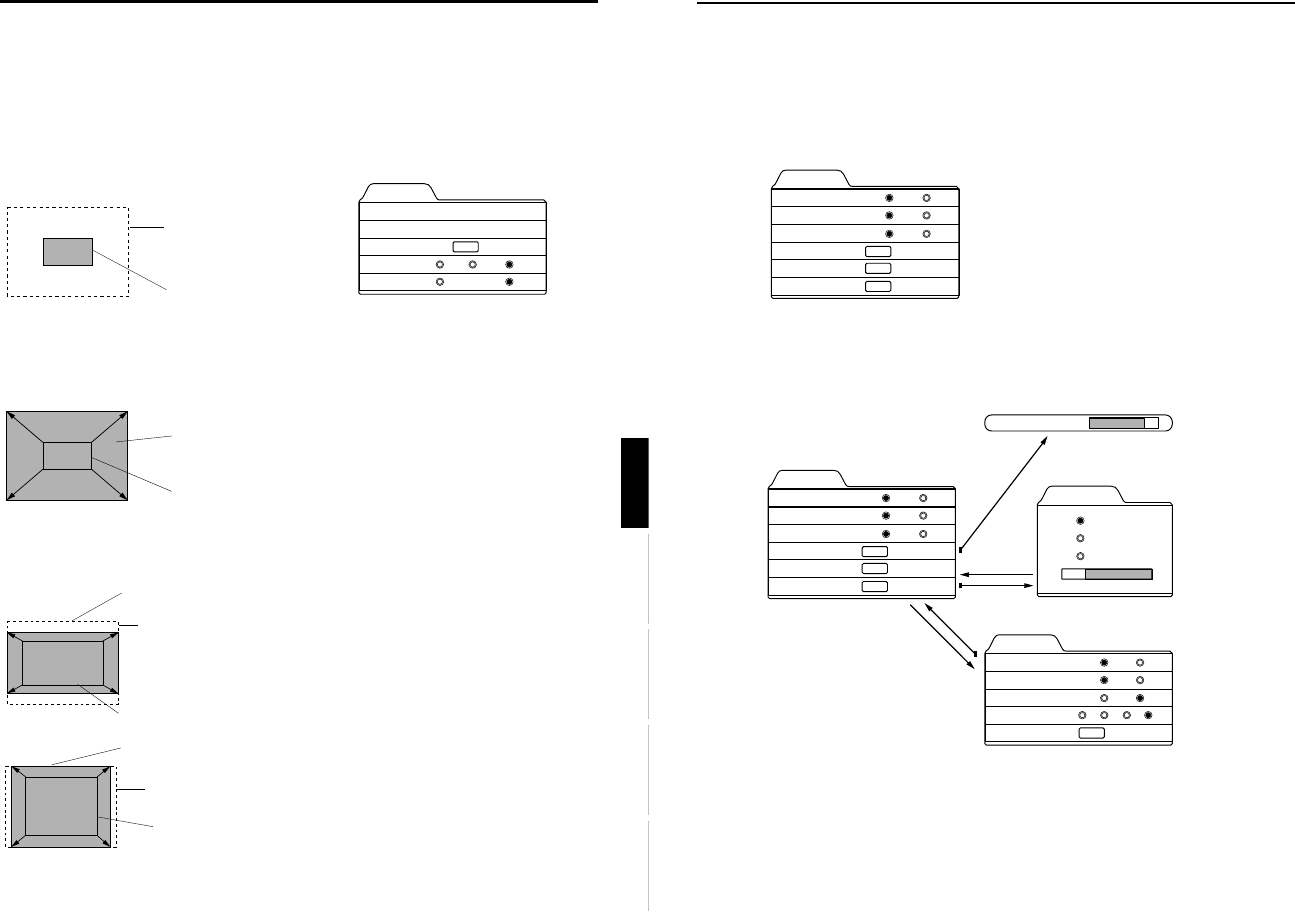
Various functions are provided as shown in the “Options 1” and “Options 2” submenus.
You can set or adjust each function, as required.
1
Press the MENU button.
The main menu appears on the screen.
2
Select “Options” with the cursor button 5
55
5 or ∞
∞∞
∞, and press 3
33
3 or the ENTER button.
The “Options 1” submenu appears on the screen.
3
Select the item to be adjusted with the cursor button 5
55
5 or ∞
∞∞
∞.
4
Make adjustment with the cursor 2
22
2 or 3
33
3.
• While the keystone item is selected, press the ENTER button to display the “Keystone” submenu.
• To enter the “Page 2” submenu, select “Page 2” with the cursor button 5 or ∞, and press the ENTER button.
• To return to the “Page 1” submenu from the “Page 2” submenu, select “Page 1” with the cursor button 5 or ∞, and press
the ENTER button.
*To adjust multiple items, repeat 3 to 4.
*To reset the keystone (trapezoidal distortion of the picture image) to the original setting, press the PRESET button when
the “Keystone” submenu appears on the screen.
Options 1
Menu display
Line display
Lamp time display
Keystone
Lamp control
Page 2
ON
15sec
5sec
ENTER
ON
OFF
OFF
ENTER
ENTER
Lamp control
Normal
LPC
LOC
Keystone 123
Options
Menu display
Line display
Lamp time display
Keystone
Lamp control
Page 2
ON
15sec
5sec
ENTER
ON
OFF
OFF
ENTER
ENTER
Page 2
Flip H
Flip V
RS-232C [bps]
Sleep time [min]
Page 1
OFF
OFF
9600
ENTER
ON
ON
19200
15 30 60 OFF
ENTER
ENTER
ENTER
ENTER
ENTER
53
Menu Operations
ENGLISHDEUTSHFRANÇAISITALIANOESPAÑOL
Changing the Image Size - Resize Function (PC Menu Mode Only)
The picture image projected can be selectable with the
Resize function which is available only in PC menu mode.
You can choose the video image size projected from the
following: (Factory setting is “Aspect”.)
“1:1”: The image is displayed at the input resolution. The
picture image projected is not enlarged even if its
number of pixels (resolution) is smaller than that of
the projector’s D-ILA element (1365 pixels × 1024
pixels).
Panel:The picture image projected is virtually enlarged to
the full size (1365 pixels × 1024 pixels). The
horizontal and vertical enlargement ratio will differ
depending on the original image and the image will
be deformed.
Aspect:While maintaining the original aspect ratio, the video
image projected is virtually enlarged until either the
horizontal or vertical side reaches the full size (1365
pixels × 1024 pixels).
1
Press the MENU button.
The main menu appears on the screen.
2
Select “Set up” with the cursor button
5
55
5 or ∞
∞∞
∞, and press 3
33
3 or the ENTER
button.
The “Set up” submenu appears on the screen.
PC submenu
3 Select “Resize” with the cursor button
5
55
5 or ∞
∞∞
∞.
4
Choose “1:1”, “Panel”, or “Aspect”
with the cursor button 2
22
2 or 3
33
3.
5 Press the EXIT button to return to the
previous menu or press the MENU
button to exit the menu mode.
Changing the Clamp pulse position
(PC Menu Mode Only)
When the image is too dark or bright, or when the image is
unstable, switching the position may improve the image
quality. Normally, set to “BP”.
1
Press the MENU button.
The main menu appears on the screen.
2
Select “Set up” with the cursor button
5
55
5 or ∞
∞∞
∞, and press 3
33
3 or the ENTER
button.
The “Set up” submenu appears on the screen.
3
Select “Clamp” with the cursor button
5
55
5 or ∞
∞∞
∞.
4
Choose “ST” or “BP” with the cursor
button 2
22
2 or 3
33
3.
5
Press the EXIT button to return to the
previous menu or press the MENU
button to exit the menu mode.
ST: Sync Tip BP: Back Porch
Resize: 1:1
Full size (1365 × 1024)
Image not enlarged
Image enlarged
to the full size
(1365 × 1024)
Image not enlarged
(Original image)
Resize: Panel
Full size (1365 × 1024)
Resize: Aspect
Image enlarged to the aspect size.
(Example: aspect ratio is 16:9)
Full size (1365 × 1024)
Image enlarged to the aspect size.
(Example: aspect ratio is 5:4)
Image not enlarged (original image)
(Example: aspect ratio is 16:9)
Image not enlarged
(original image)
(Example: aspect ratio is 5:4)
Set up
Tracking
Phase
Position
Resize
Clamp
123
12
ENTER
ST BP
1:1 Panel Aspect


