


5 Press Start Color or Start Black.
6 Follow the instructions on the computer screen.
Scanning text for editing
Use the Optical Character Recognition (OCR) software feature to turn scanned images into text you can edit with a
word-processing application.
1 Make sure:
• The printer is connected to a computer, and both the printer and the computer are on.
• ABBYY Fine Reader is installed.
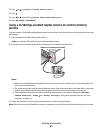
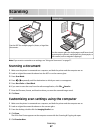
2 Load an original document facedown into the ADF or on the scanner glass.
Note: Do not load postcards, photos, small items, transparencies, photo paper, or thin media (such as magazine
clippings) into the ADF. Place these items on the scanner glass.
3 From the desktop, double-click the Imaging Studio icon.
4 Click Scan & Edit Text (OCR).
5 Click Preview Now.
Note: Preview is not supported when using the Automatic Document Feeder. You can preview one page at a
time when using the scanner.
6 Select a word-processing program to edit the text.
7 Click Send Now.
8 Edit and save the document.
Scanning images for editing
1 Make sure the printer is connected to a computer, and both the printer and the computer are on.
2 Load an original document facedown into the ADF or on the scanner glass.
Note: Do not load postcards, photos, small items, transparencies, photo paper, or thin media (such as magazine
clippings) into the ADF. Place these items on the scanner glass.
3 From the desktop, double-click the Imaging Studio icon.
4 Click Scan.
5 From the “Send scanned image to” menu, select a graphics program to edit the images.
6 Click Scan Now.
When the image finishes processing, it opens in the program you selected.
7 Edit the image using the tools available in the graphics program. For more information, see the documentation
that came with the graphics program.
Scanning
69