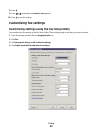
5 Click each tab, and change the settings as needed.
Tab Options
Dialing and Sending
• Select the telephone line format you want to use.
• Enter a dialing prefix.
• Select a dialing volume.
• Enter your name and fax number.
Notes:
– You can include a calling card number as part of the fax number.
– Enter a maximum of 64 digits in a fax number.
• Select the number of times you want the machine to redial and the time
between those attempts if the fax cannot be sent on the first try.
• Choose whether to scan the entire document before dialing the
number.
Note: Select After Dial if you are sending a large fax or a
multiple-page color fax.
• Select a maximum send speed and print quality for outgoing faxes.
• From the “Automatic fax conversion” line, select ON to match the
resolution setting of the receiving fax machine.
Ringing and Answering
• Select incoming call options.
• Select auto answer options.
• Select whether you want to forward a fax, or print it and then forward
it.
• Enter a fax forwarding number.
• Manage blocked faxes.
Fax Printing / Reports
• Automatically reduce an incoming fax to fit to the paper size loaded,
or print it on two sheets of paper.
• Choose whether to print a footer (the date, time, and page number) to
appear on each page you receive.
• Select a paper source.
• Choose whether to print on both sides of the paper.
• Select when to print fax activity and confirmation reports.
Speed Dial Create, add to, edit, or delete entries from the Speed Dial list, including
Group Dial entries.
6 Click OK after you finish customizing the settings.
7 Close the Fax Setup Utility.
Setting up a fax header
During the initial setup of your printer, you were prompted to enter your name, fax number, date, and time. This
information is used to create a fax header for faxes you send.
Faxing
81


