


18
Chapter 3, Defining Your Adobe Premiere Pro Settings
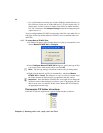
Loading project presets
The Matrox realtime plug-in for Adobe Premiere Pro includes project presets that
you can load to immediately apply appropriate Matrox RT.X2 settings. For more
information about using the Matrox project presets for working with different
types of projects, see Appendix B, “Matrox RT.X2 Workflows.”
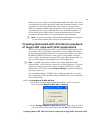
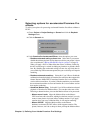
°To load a Matrox project preset:
1 Start Adobe Premiere Pro and click the New Project icon. The New
Project
dialog box appears.
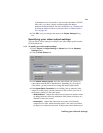
2 From the appropriate Matrox folder (Matrox - SD to create an SD project,
or
Matrox - HD to create an HD project), select the preset that matches the
type of project you want to create. For example, if you want to create an
NTSC project in which you’ll capture clips to DV/DVCAM format and work
in a standard 4:3 editing environment, expand the
NTSC and Standard
folders under
Matrox - SD, then select the DV preset.
Remarks
$ Matrox RT.X2 SD supports creating SD projects only. Therefore, the
Matrox HD presets are not available on RT.X2 SD.
$ Matrox HD presets are provided for capturing HDV material. Make sure
you select the appropriate preset for your HDV footage, such as the
Matrox
1440x1080i 29.97 fps HDV
preset if your footage was shot in Sony
1080/60i format, or the
Matrox 1440x1080i 25 fps HDV preset if your
footage was shot in Sony 1080/50i format. On RT.X2 SD, you can capture
HDV material in an SD project as explained in “Capturing HDV material
on Matrox RT.X2 SD” on page 35.
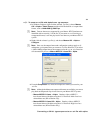
3 From the Location list, select where you want to save the project on your
A/V drive.
4 In the Name box, specify a name for your project.
5 Click OK to apply the settings.