


33
Defining your Capture settings
be used only if the .avi file does not have any associated .wav files.
Therefore, if you perform audio post processing on your .avi files, make
sure you delete the associated .wav files so that only the embedded audio
in the .avi files will be used in your project.
$ When performing an audio-only capture, Matrox RT.X2 supports capture
of only one stereo pair. Your first stereo or first two mono channels will be
saved to a single stereo .wav file (any other channels will be ignored). When
RT.X2 saves the .wav file of an audio-only capture, it does not assign the
.Stereo.wav suffix to the filename.
7 Click OK to save your settings and return to the Project Settings dialog
box.
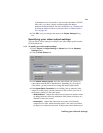
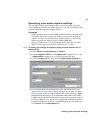
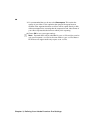
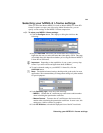
Monitoring audio levels for capture
If you select
Show VU meters on the Audio Capture Settings page, each
time you configure your Matrox RT.X2 capture settings or open the
Capture
panel to start a capture in Adobe Premiere Pro, VU meters will be displayed to let
you monitor the levels of your currently selected audio input source.
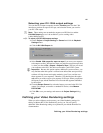
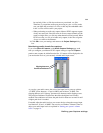
As you play your audio source, the color of the input level is green at or below
–12 dBSF, yellow between –12 and –6 dBFS, and red above –6 dBFS. The
clipping detectors will “light up” (become red) whenever audio clipping occurs.
The peak level indicators are thin lines that show the highest level recently
reached. These indicators will show the peak level for about two seconds or until
a higher peak level is reached.
If needed, adjust the audio level on your source device to keep the average input
level between –30 and –10 dBSF. You can also use Windows Volume Control to
adjust your audio input levels as explained in “Setting your system’s volume
levels” on page 16.
Clipping detectors
Peak level indicators