


19
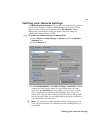
Setting up your scratch disks
Setting up your scratch disks
When specifying the location of your scratch disks in Adobe Premiere Pro, make
sure you follow the recommendations in your Adobe Premiere Pro User Guide.
For example, always store your video and audio files on an A/V drive.
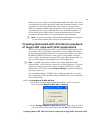
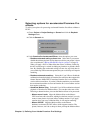
°To specify your scratch disks:
1 Choose Edit > Preferences > Scratch Disks.
2 Under Scratch Disks, select an appropriate A/V drive letter for each scratch
disk type.
¥Tip To enhance performance, store your media cache files on a drive
separate from your video files.
3 Click OK to save your preferences.
¡ Important Make sure that you specify the same scratch disk settings for all
your projects. This will help shorten the amount of time it takes to open new or
existing projects.
Displaying warnings in Adobe Premiere Pro’s
Events panel
Matrox RT.X2 uses Adobe Premiere Pro’s Events panel to issue certain error
messages and warnings. To display these, choose
Window > Events. For more
information about using the
Events panel, see your Adobe Premiere Pro
documentation.
Mixing interlaced and progressive clips in a
project
When editing on Matrox RT.X2, you can mix interlaced and progressive clips in
the same project, as long as the clips have the same frame size and frame rate.
Both the interlaced and progressive clips will play back in real time. For example,
when working in an NTSC project you can import NTSC clips as well as 486p @
29.97 fps clips, and 1440×1080p @ 29.97 fps clips to which you’ve applied
realtime scaling as explained in “Mixing SD and HD clips in a project” on
page 20.
You should be aware, however, that when you apply effects to clips that have a
scanning mode (progressive or interlaced) that doesn’t match your project, some
undesirable artifacts may appear in your clips.