


7-32
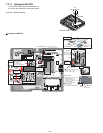
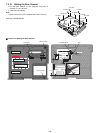
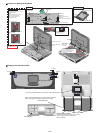
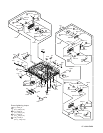
! Cautions for Setting the Keyboard
! Putting of the Palm Rest ASSY
Before setting the KBD Plate (L)
and the KBD Plate (R),
press on the positions (four)
with the two-sided tapes.
30N(3.0Kgf)
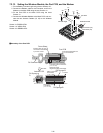
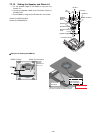
Keyboard
KBD Tape
Fix from the
Hinge side.
Fix from
the Hinge side.
Connect the KBD FFC.
KBD Connector Cover
Lengthwise:
Match to the center line.
Crosswise:
Match to the end of the KBD.
Lengthwise:
Match to the center line.
Crosswise:
Match to the end of the KBD.
Lengthwise: Match to the top end of the KBD.
Keyboard
8~
10mm
0~1mm
0~1mm
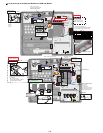
Set it and then press it using the jig.
(Insert the Hook first.)
Push the Cushion of the jig into the part with dotted frame ("A"),
and press on the jig until the both ends of jig fit to the Top Case ("B").
A
B
B
KBD CNT LID
HINGE COVER
Jig
CUSHION
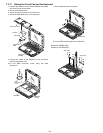
KBD Tape
KBD Tape
KBD Tape
Screw
Screw
Screw
KBD Plate(L)
KBD Plate(R)
Screw
Screw
Screw
Screw
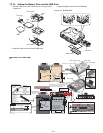
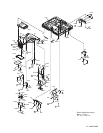
Digitizer Model
Connect the Connector to the part
with dotted frame.
(Note
Hold the Connector part when
connecting/disconnecting.
Do not bend at the foot
of stiffening plate.)
Connector for the KBD FFC.
Connector for the KBD FFC.
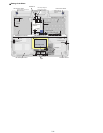
Safety Working
LCD CABLE
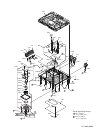
Touch Panel model
KBD Connector Cover
Apply the load to attach. 30 to 40N
(3.0 to 4.0 Kgf)
KBD Connector Cover Sheet
KBD Connector Cover
0–0.5mm
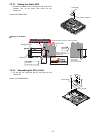
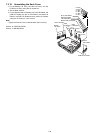
Palm rest Assy
LED Waterproof Sheet
Set the four Hooks.
Match to the upper left corner. 0 to 0.3 mm
Avoid running over when attaching.
Don’t overflow.
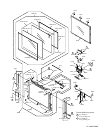
Release Paper
Remove the two-sided tape on the back side and attach it.
Attach and apply the load 30 to 40N (3.0 to 4.0 Kgf).
Remove the Release Paper, and then attach the Palmrest Assy.
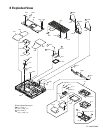
3~5mm
5~7mm
3~5mm
4~6mm
Windows Logo Label
intel Label
Energy Star Label