


© 2015 Microsoft Page 5
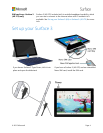
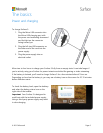
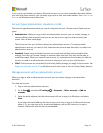
Plug the Micro USB connector into the Micro
USB charging port with the power cord
extending downward and the light on the
connector facing toward you.
Plug the full-size USB connector on the other end
of the cord into the power supply, and plug the
power supply into an electrical outlet.
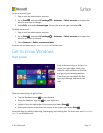
Press the power button to turn Surface 3 on.
Windows starts, and guides you through the setup
process.
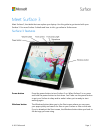
Use the Surface 3 touchscreen or Surface 3 Type Cover (sold separately) to enter info during setup.
To set up Surface 3, you’ll also need:
An Internet connection (recommended). Setup will automatically try to connect to a network. If
your network requires a password, you’ll need to have it handy. If you don’t have an Internet
connection, you can still set up your Surface, but you won’t get the latest Windows and Surface
updates until you’re online.
If you have a Surface 3 (4G LTE), use a Wi-Fi connection for setup if you can. Wi-Fi is usually
cheaper and faster than a mobile broadband connection.
An account name. If you have a Microsoft account, use it to set up your Surface 3. A Microsoft
account is an email address and password you use to sign in to other Microsoft services like
Xbox, Hotmail, Outlook.com, OneDrive, Skype, or Windows Phone. If you don’t already have a
Microsoft account, you can create one during setup. If you prefer, create a local account. For
more info, see Microsoft account or local account?
For more info on getting set up, see Set up your Surface on Surface.com.