


Connecting Your Local Area Network 4-1
CC
CC
hh
hh
aa
aa
pp
pp
tt
tt
ee
ee
rr
rr
44
44
CC
CC
oo
oo
nn
nn
nn
nn
ee
ee
cc
cc
tt
tt
ii
ii
nn
nn
gg
gg
YY
YY
oo
oo
uu
uu
rr
rr
LL
LL
oo
oo
cc
cc
aa
aa
ll
ll
AA
AA
rr
rr
ee
ee
aa
aa
NN
NN
ee
ee
tt
tt
ww
ww
oo
oo
rr
rr
kk
kk
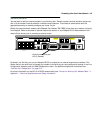
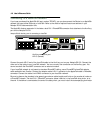
This chapter describes how physically to connect the Netopia R3100 ISDN Router to your local area network
(LAN). Before you proceed, make sure the Netopia R3100 is properly configured. You can customize the
Router’s configuration for your particular LAN requirements using Console-based Management (see
“Console-based Management” on page 6-1).
This section covers the following topics:
■ “Overview” on page 4-1
■ “Readying computers on your local network” on page 4-2
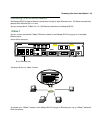
■ “Connecting to an Ethernet network” on page 4-3
■ “Remote console” on page 4-5
■ “Connecting to a LocalTalk network” on page 4-6
Overview
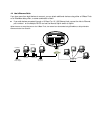
You can connect the Netopia R3100 to an IP or IPX network that uses Ethernet.
If you have purchased the AppleTalk feature expansion kit (order Netopia P/N TER/ATI), you can also connect
the Router to a LocalTalk network that uses PhoneNET cabling. On Netopia R3100 ISDN Routers, the AppleTalk
kit LocalTalk features require minimum firmware version 4.3.
See the sections later in this chapter for details on how to connect the Netopia R3100 to different types of
networks.