


Chapter 1 Calibration
36
11. Power the printer off, wait a few seconds, then power the
printer on.
If the calibration was successful, the scanning beam is on and
the CALIBRATION light is off.
If the calibration was not successful, the scanning beam
remains on and the CALIBRATION light stays lit without
flashing. Repeat the calibration procedure. If repeated attempts
fail, check the room for excessive ambient light, including direct
sunlight. You may need to move the printer to a darker area of
the room.
NOTE: In some cases the validator can detect and indicate to the
printer that calibration is required. See “Calibration
warning” in Table 6, page 86.
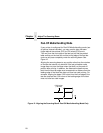
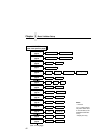
Bar Code Validation Demo Page
The bar code validation demo page allows you to test or
demonstrate the validator operation without a host computer. This
page contains some text and two good bar code symbologies: one
in Code 39, the other in Code 128.
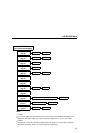
To print and validate the bar code validation demo page:
1. Load the factory default configuration. (Refer to the
User’s
Manual
.)
2. In the VALIDATOR menu, set Validator Funct. to Enable.
3. In the CALIBRATE CTRL menu, set Gap/Mark Sensing to Gap.
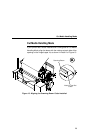
4. Load media.
5. In the CALIBRATE CTRL menu, run Auto Calibrate for proper
gap sensing.
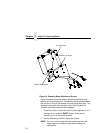
6. The printer must be offline. If the printer is in Menu mode, press
the PAUSE key to take the printer offline.
7. Press the TEST PRINT key to enter the Test Print menu.
Continue to press TEST PRINT until Barcode Demo displays.
8. Press the
↵ key to print and validate the demo page. (If the ↵
key is locked, unlock it by pressing ↓ and
↵ at the same time.)