


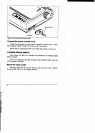


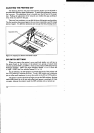

ADJUSTINGTHE PRINTINGGAP
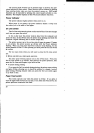
The distance between the print head and the platen can be adjusted to
accommodatedifferentpaper thicknesses.To make thisadjustment, remove
the top cover. The adjustment leveris located near the left end of the paper
bail. Pulling the adjustment lever towards you widens the gap; pushing it
away from you narrows the gap.
There are fourpositions;youcan feeltheleverclickinginto eachposition.
The first position (narrowest gap) is the one most commonlyused for single
sheetsof paper. Try differentpositionsuntilyou getthe bestprinting results.
1
Figure7-14. Adjusting for different thicknesses of paper
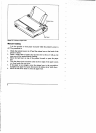
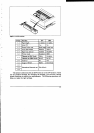
DIP SWITCH SEITINGS
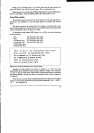
When you remove the printer’scover and look inside, you will see on
the green board at the bottom of the printer two groups of small white
switchesmarked DSW1and DSW2. Theseare theprinter’sDIP (Dual In-line
Package) switches. DSW1 has eight switches,named 1-1to 1-8from left
to right. DSW2 has four switchesnamed 2-1 to 2-4.
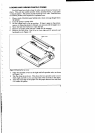
For all switches,the ON position is towards the back of the printer and
the OFF position is towards the front. To set a DIP switch,use a ballpoint
pen or other smallimplementto movethe switchto the ON or OFF position.
Theprinter’s powershouldbeoffwhenyousetthe DIP switches.Settings
made whilepower is on do not take effect until power is switchedoff, then
on again, becausethe printer reads the DIP switchesonly at power-up.
—
—
—
—.
—
—
—
—
—
—
—
14
.—