


11-12 Sun Fire V120 and Netra 120 Server User’s Guide • December 2001
11.6 Replacing the System Board
Caution – The procedure below is for the attention of qualified service engineers
only. Before touching or replacing any components inside the server, disconnect all
cables and follow the instructions in Section 4.2, “Opening the Server” on page 4-4
which tell you how to open the server. Always place the server on a grounded ESD
pad and wear a properly grounded antistatic wrist strap.
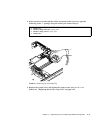
To perform the steps in this section, you need a 5mm nut-spinner to remove and
replace the SCSI pillars on the rear of the chassis.
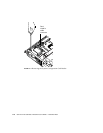
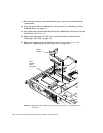
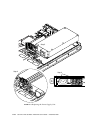
11.6.1 Removing the Old System Board
1. Open the server by following the instructions in Section 4.2, “Opening the
Server” on page 4-4.
Make sure all external cables are disconnected and pay particular attention to the
information about how to prevent electro-static discharge from your body from
damaging the components of the server.
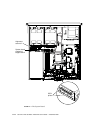
2. With the server open and seated on top of an ESD pad, and with a properly
grounded antistatic wrist strap on your wrist, do the following:
a. Disconnect all power supply cables from the system board.
b. Disconnect the DVD or CD-ROM ribbon cable from the system board.
c. Disconnect the memory card reader cable from the system board.
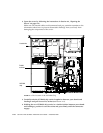
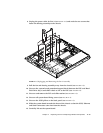
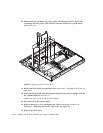
3. Remove the server’s front bezel.
4. Remove the hard disk drives in the server (see Section 4.1, “Installing and
Removing Hot-Pluggable SCSI Hard Disk Drives” on page 4-2).
5. Remove the PCI card if you have one installed (see Section 4.6.2, “Removing a PCI
Card” on page 4-14).
6. Remove the DIMMs from their slots (see Section 4.5, “Installing and Removing
Memory” on page 4-9).
7. Remove the rear fan subassembly (see Section 11.8, “Replacing the Rear Fan
Subassembly (Fans 1 and 2)” on page 11-19).