


4-2 Sun Fire V120 and Netra 120 Server User’s Guide • December 2001
4.1 Installing and Removing Hot-Pluggable
SCSI Hard Disk Drives
Note – The server and Hard Disk Drives contain electronic parts that are extremely
sensitive to static electricity. Do not touch any metal parts. Wear an antistatic wrist
strap.
The Hard Disk Drives are hot-pluggable modules. This means that you do not need
to power off the server or remove it from the rack to install or remove the Hard Disk
Drives.
However, you do need to make sure that no system or application software is using
a Hard Disk Drive when you remove it.
Note – If you intend to remove a Hard Disk Drive with Solaris running, follow the
instructions in Appendix A before performing the steps below.
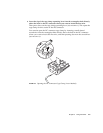
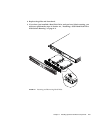
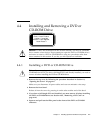
1. Remove the front bezel.
Release the bezel from the server by pressing in on the tabs at either end of the bezel.
2. Pull out the grilles.
3. Do one of the following:
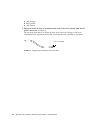
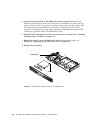
■ If you are installing a Hard Disk Drive, slide it into its tray at the front of the
server (see
FIGURE 4-1). Push it in firmly until the metal lever starts to close: this
indicates that it has engaged with the backplane connector. Then, push the metal
lever until the disk drive clicks into place.
Note – When inserting a Hard Disk Drive into its enclosure, make sure the top of
the drive is touching the top of the enclosure. If you try to install it with the bottom
of the drive touching the bottom of the enclosure, the drive will not align with the
slide rails inside the enclosure, and you will not be able to insert the disk.
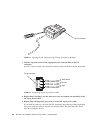
■ If you are removing a Hard Disk Drive, locate the latch at the front of the disk and
slide it to the right (see
FIGURE 4-1). This causes the metal lever to open. Holding
the latch, pull the disk part way out of its bay and leave it for a minute to make
sure it has stopped spinning. (If a disk is fully removed while it is still spinning,
gyroscopic forces can damage its bearings.) When it has stopped spinning, pull it
out of the chassis.