


A
A-10 Color Measurement Instruments
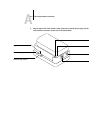
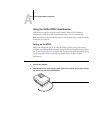
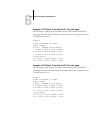
4. Plug the small connector on the adapter cable into the side of the X-Rite DTP32 and
plug the AC adapter into a wall outlet.
5. Turn on the computer.
6. Calibrate the DTP32 (see the following section).
7. Calibrate the GA-1121 using ColorWise Pro Tools and the DTP32 (see page 2-22).
Calibrating the DTP32
You will need the black-and-white X-Rite Auto-Cal Strip included with the
densitometer. Calibrating the densitometer does not require ColorWise Pro Tools.
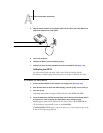
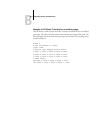
TO CALIBRATE THE X-RITE DTP32
1. Connect the densitometer to the computer and supply power (see page A-8).
2. From the Main Menu on the X-Rite DTP32 display, press the p1 key once to reach p2.
3. Press the cal key.
Calibrating motor speed is displayed, followed by the words INSERT CAL STRIP.
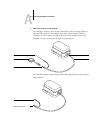
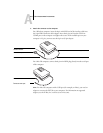
4. Insert the X-Rite Auto-Cal Strip into the 35mm slot on the front of the X-Rite DTP32—
arrow end first—until it stops or the densitometer starts pulling the strip.
Reading appears momentarily, followed by the density values and CALIBRATION OK.
The densitometer automatically returns to the
MAIN MENU.
If
UNRECOGNIZABLE STRIP appears, repeat the process or try cleaning the strip (see the
X-Rite DTP32 Operating Manual).
AC adapter
Small connector