


3
3-27 Using Spot-On
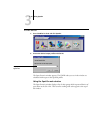
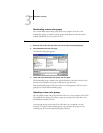
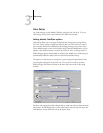
Saturation generates neighbor patches based on less saturated to more saturated
variations of the original color. This variation is displayed from left to right, with the
original color remaining in the center of the middle group.
Choose a setting from the Color Spacing menu to control the closeness of the neighbor
patches.
A higher setting generates neighbor patches that differ more noticeably from the center
color. As you get closer to your target color, reduce the color spacing to a smaller value.
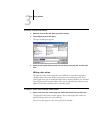
Select Monitor Compensation to simulate how all the on-screen color patches will
appear when printed on paper.
This simulation depends on the monitor profile that has been configured for the
display. To specify the monitor profile, choose Preferences from the Edit menu in the
Spot-On main menu.
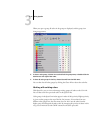
If you use the monitor that is part of the option, select the monitor profile that is
installed with the option. If you use another monitor, select a profile customized to
describe the characteristics of that monitor.
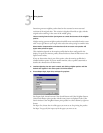
4. Continue adjusting the color patch controls and clicking neighbor patches until the
desired color appears in the center patch. Click Print Pattern.
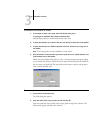
5. Choose Output Style, Paper Size, and Paper Tray options.
For Output Style, choose between Color Search Pattern and Color Neighbor Pattern.
Color Search Pattern prints patches with the same pattern as displayed in the Color
Search window. Color Neighbor Pattern prints patches in a three column by eight row
format.
For Paper Size, choose the size of the paper you want to use for printing the patches.
For Paper Tray, specify the input tray for the paper you want to use.