


3
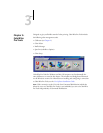
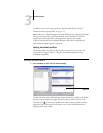
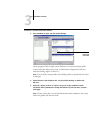
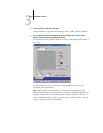
3-7 Profile Manager
4. Click OK when you are notified that the profile was successfully uploaded.
Delete profiles to ensure that the wrong profiles are not used, and to free up disk space
on the GA-1121 (although profiles are small and do not take up much space).
TO DELETE PROFILES FROM THE GA-1121
1. Start ColorWise Pro Tools and click Profile Manager.
2. Select the profile you want to delete and click Delete.
A Warning dialog box asks you to confirm the deletion.
NOTE: You cannot delete preset profiles, profiles that are currently set as default, or
profiles that are linked to any of the predefined custom names, for example
Simulation-1.
3. Click Yes to delete the profile.
4. To delete a profile currently set as the default or associated with a custom name, click
Profile Settings and clear the default option.
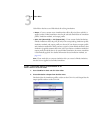
Defining profiles
For Mac OS computers, before you apply any downloaded or edited profile to a print
job, that profile must be linked to one of the predefined custom names, or you can set
the profile as the default for all print jobs (see “Setting the default profiles” on
page 3-3). Ten names are available for custom profiles—Source-1 through Source-10
for RGB Source, Simulation-1 through Simulation-10 for Simulation, or Output-1
through Output-10 for Output.
For Windows computers, all profiles appear by their actual names in the printer driver.
These fixed names are used in the printer driver, so you can select profiles per job even
if your driver does not have the capability to obtain an updated list from the GA-1121.
NOTE: A custom simulation profile is used to illustrate this procedure. The same steps
apply for defining output profiles.