


2
2-25 Using AutoCal and ColorCal
Calibrating with ColorWise Pro Tools and AutoCal, or ColorCal
When you run ColorCal from ColorWise Pro Tools, you have the option to calibrate
the copier/printer’s scanner before calibrating the GA-1121 itself. This option is not
available for AutoCal. It is recommended to calibrate the scanner for ColorCal when
the copier/printer output has been adjusted, such as after maintenance or service.
NOTE: The instructions for ColorCal refer to the document feeder (DF) on the copier
as the scanner.
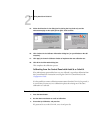
TO CALIBRATE WITH COLORWISE PRO TOOLS AND AUTOCAL, OR COLORCAL
1. Start ColorWise Pro Tools (on your Mac OS or Windows computer).
2. Start Calibrator.
For instructions on starting Calibrator, see page 2-6.
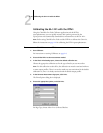
3. In the Select Measurement Method pane, choose AutoCal or ColorCal.
4. In the Check Print Settings pane, choose the desired Media.
If more than one option appears, choose the appropriate calibration set for the type of
media you will use most often.
NOTE: For this calibration to take effect, the calibration set must be associated with an
output profile. If you choose the default calibration set, you do not need to make a
new association. The default calibration set is already associated with the default
output profile.
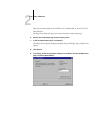
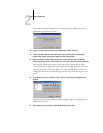
5. Click Print in the Generate Measurement Page pane.
6. Choose the Input Tray to use for the measurement page, and click Print.
The Page Type is automatically set to AutoCal Page or ColorCal Page. The Paper Size
is automatically set to LTR/A4.
7. Click OK when prompted.
8. Retrieve the Measurement Page from the copier/printer.
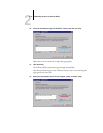
9. Click Measure in the Get Measurements pane.
If you chose the AutoCal method, skip to step 14.