6. TERMINAL FILE PROGRAMMING
EO3-11106
6.5 System Option Programming
6-20
(continued from the previous page)
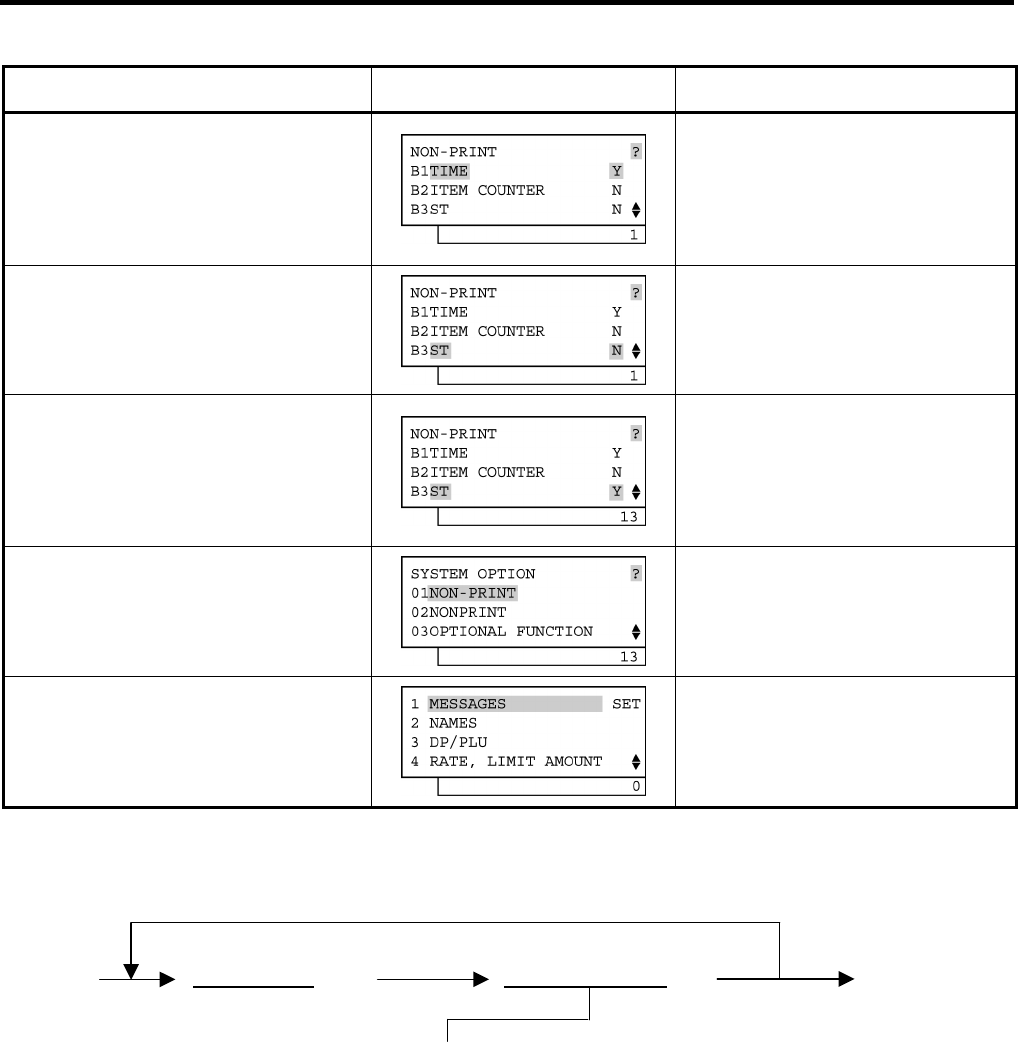
Operation LCD Display Remarks
Depress the [→] key to select the
status of Bit No. 1.
The status of Bit No.1 is turned from N to Y.
N: RESET status
Y: SET status
The numeric value 1 indicating the Bit No.
with SET status is displayed on the 7-
segment Numeric display.
Depress the [↓] key twice to move the
cursor on to Bit No. 3 (B3ST).
Depress the [→] key to select the
status of Bit No. 3.
The status of Bit No.3 is turned from N to Y.
N: RESET status
Y: SET status
The numeric value 13 indicating the Bit Nos.
with SET status is displayed on the 7-
segment Numeric display.
The [Enter] key depression results in
that the Address No. 1 setting is
entered.
The [End] key depression allows the
ECR to end this programming.
A long receipt is issued and the display
returns to Main Menu screen.
Programming in BLIND mode
Repeat for another Address No.
18 [X] | Address No.
| [ST] | Bit Nos for “SET” | [#] [AT/TL]
Enter a maximum of eight-digit number composed of Bit Nos
whose status must be selected to SET status in the Address.
ex.) To set Bit No. 2 only ...................... Enter 2.
To set Bits No. 2 and No. 3 ........... Enter 23.
To set all the Bit Nos ..................... Enter 12345678.
To reset all the Bit Nos .................. Enter 0.
NOTES:
1. Any Bit No. with the “-- vacant --” item will be ignored even if it is set.
(However, even if set, it will not result in an error.)
2. When a RAM Clear is completed, the status of each Bit No. is automatically set to the side marked with an
asterisk in the STANDARD STATUS column of each SYSTEM OPTION TABLE shown on the following
pages. Therefore, only the Bit status changes of the required Addresses may be entered according to your
customer’s requirements.


