Prestige 128MH PSTN Router/Hub
5-17
Chapter 5 Remote Node Configuration for LAN-to-LAN
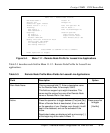
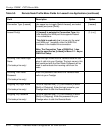
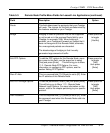
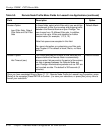
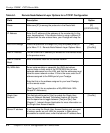
Table 5-3. Remote Node Profile Menu Fields for Leased Line Applications (continued)
Field Description Option
Route This field determines the protocols that your Prestige
will route. The choices for this field are determined by
the features enabled on your Prestige.
Bridge Bridging is used for protocols that are not supported
or not turned on in the previous Route field by your
Prestige, for example, SNA. When bridging is
enabled, your Prestige will forward any packet that it
does not recognize to this Remote Node; otherwise,
the unrecognized packets are discarded.
The disadvantage of bridging is that it usually
generates large amounts of traffic.
Press space bar
to toggle
[Yes/No]
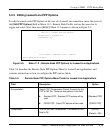
Edit PPP Options To edit the PPP options for this Remote Node, move
the cursor to this field, use the space bar to select
[Yes] and press [Enter] . This will bring you to Menu
11.2 - Remote Node PPP Options. For more
information on configuring PPP options, see the
section Editing PPP Options.
Press space bar
to toggle
[Yes]
then press
[Enter]
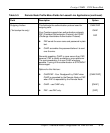
Rem IP Addr This is a required field [?] if [Route] is set to [IP]. Enter
the IP address of this Remote Node.
Edit IP/IPX/Bridge Options To edit the parameters, select [Yes] and press [Enter].
This will bring you to Menu 11.3 - Remote Node
Network Layer Options. For more information on this
screen, refer to the chapter pertaining to your specific
protocol.
Press space bar
to toggle
[Yes]
then press
[Enter]
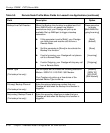
Rem Password This is a required field [?] if [Route] is set to [IP]. Enter
the password used when this Remote Node calls into
your Prestige.


