


Chapter 30 ADP
ZyWALL USG 300 User’s Guide
447
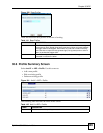
The following table describes the screens in this screen.
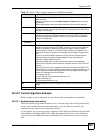
30.4 Configuring Anomaly Profile Bindings
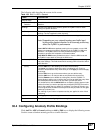
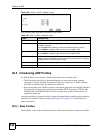
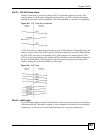
Click Anti-X > ADP > General and then an Add or Edit icon to display the following screen.
Use this screen to bind an anomaly profile to a traffic direction.
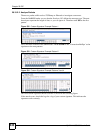
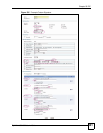
Table 139 Anti-X > ADP > General
LABEL DESCRIPTION
General Setup
Enable Anomaly
Detection
Select this check box to enable traffic anomaly and protocol anomaly
detection.
Bindings Use this list to specify which anomaly profile the ZyWALL uses for traffic
flowing in a specific direction.
Priority This is this binding’s rank in the list of anomaly profile to traffic direction
bindings. The list is applied in order of priority.
From, To This is the direction of travel of packets to which an anomaly profile is bound.
Note: Depending on your network topology and traffic load,
binding every packet direction to an anomaly profile may
affect the ZyWALL’s performance.
From LAN To LAN means packets traveling from a computer on one LAN
subnet to a computer on another LAN subnet via the ZyWALL’s LAN zone
interfaces. The ZyWALL does not check packets traveling from a LAN
computer to another LAN computer on the same subnet.
From WAN To WAN means packets that come in from the WAN zone and
the ZyWALL routes back out through the WAN zone.
Anomaly Profile An anomaly profile is a set of anomaly rules with configured activation, log
and action settings. This field shows which anomaly profile is bound to which
traffic direction.
(Icons) Click the Add icon in the heading row to add a new first entry.
The Active icon displays whether the entry is enabled or not. Click it to
activate or deactivate the entry. Make sure you click Apply to save and apply
the change.
Click the Edit icon to go to the screen where you can edit the entry.
Click the Add icon in an entry to add an entry below the current entry.
Click the Remove icon to delete an existing entry from the ZyWALL. A
window displays asking you to confirm that you want to delete the entry. Note
that subsequent entries move up by one when you take this action.
In a numbered list, click the Move to N icon to display a field to type an index
number for where you want to put that entry and press [ENTER] to move the
entry to the number that you typed. For example, if you type 6, the entry you
are moving becomes number 6 and the previous entry 6 (if there is one) gets
pushed up (or down) one.
The ordering of your entries is important as they are applied in order of their
numbering.
Apply Click Apply to save your changes.
Reset Click Reset to start configuring this screen again.