


Chapter 44 Service Control
ZyWALL USG 300 User’s Guide
609
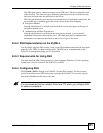
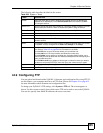
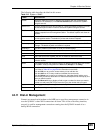
The following table describes the labels in this screen.
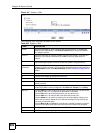
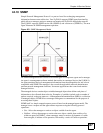
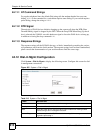
44.11 Dial-in Management
Connect an external serial modem to the AUX port to provide a management connection in
case the ZyWALL’s other WAN connections are down. This is like an auxiliary interface,
except it is used for management connections coming into the ZyWALL instead of as a
backup WAN connection.
Table 212 System > SNMP
LABEL DESCRIPTION
Enable Select the check box to allow or disallow the computer with the IP address that
matches the IP address(es) in the Service Control table to access the ZyWALL
using this service.
Server Port You may change the server port number for a service if needed, however you must
use the same port number in order to access the ZyWALL using the service.
Get Community Enter the Get Community, which is the password for the incoming Get and
GetNext requests from the management station. The default is public and allows all
requests.
Set Community Enter the Set community, which is the password for incoming Set requests from
the management station. The default is private and allows all requests.
Trap
Community Type the trap community, which is the password sent with each trap to the SNMP
manager. The default is public and allows all requests.
Destination Type the IP address of the station to send your SNMP traps to.
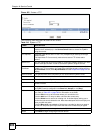
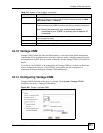
Service Control This specifies from which computers you can access which ZyWALL zones.
# This the index number of the service control rule.
Zone This is the zone on the ZyWALL the user is allowed or denied to access.
Address This is the object name of the IP address(es) with which the computer is allowed or
denied to access.
Action This displays whether the computer with the IP address specified above can access
the ZyWALL zone(s) configured in the Zone field (Accept) or not (Deny).
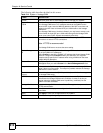
Add icon Click the Add icon in the heading row to open a screen where you can add a new
rule. Refer to Table 207 on page 592 for information on the fields.
Click the Edit icon to go to the screen where you can edit the rule.
Click the Add icon in an entry to add a rule below the current entry.
Click the Delete icon to remove an existing rule. A window display asking you to
confirm that you want to delete the rule. Note that subsequent rules move up by one
when you take this action.
Click the Move to N icon to display a field to type a number for where you want to
put that rule and press [ENTER] to move the rule to the number that you typed.
Apply Click Apply to save your changes back to the ZyWALL.
Reset Click Reset to begin configuring this screen afresh.