19
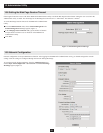
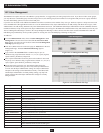
10.10 IP Installer Setting
10. Administrator Utility
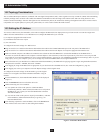
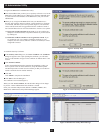
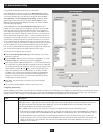
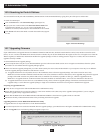
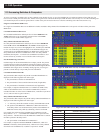
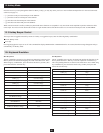
You can use the IP Installer to view and change network settings for the B060-032-8. The IP Installer can be downloaded from our Website. Follow these
instructions to confi gure the IP installer as desired:
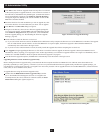
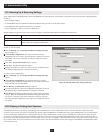
Click Enabled to allow the IP Installer to be used to change the IP address, subnet mask, and gateway for the B060-032-8.
Click View Only to allow the IP Installer to be used to view the IP address, subnet mask, and gateway for the B060-032-8, but not change it.
Click Disabled to restrict the IP Installer from being used to view or change the network settings for the B060-032-8.
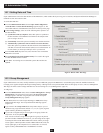
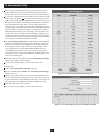
IP Address
You can either manually enter a static IP address or use a DHCP server to dynamically assign one. If you enable a DHCP server to assign an IP address to
the B060-032-8, we recommend that you confi gure the B060-032-8 to send an e-mail notifi cation if the IP address changes, which is explained later in this
section.
To use a DHCP server to assign an IP address:
Under DHCP Enabled, click Yes . Obtain the IP Address pulled by the DHCP server from your network administrator. To manually assign an IP address:
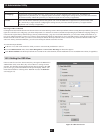
(a) Under DHCP Enabled, click No.
(b) Under Manual IP Address, enter the IP address, subnet mask, default gateway, and primary DNS server as given to you by your Network
Administrator. You can also enter an alternate DNS server; however, it is not required.
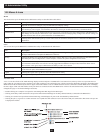
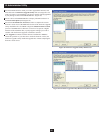
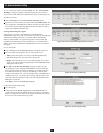
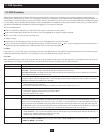
Port Settings: Enter the network ports that the B060-032-8 will use to transfer WebPages and communicate with client programs. Typically, port 80 is
used for Hyper Text Transfer Protocol (HTTP) communications, while port 443 is used for HTTP over Secure Socket Layer (HTTPS). Failure to assign a
port for each fi eld will cause the B060-032-8 Administrator Utility to function incorrectly.
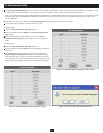
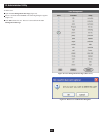
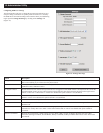
System Event Reports: The B060-032-8 can be confi gured to send an e-mail notifi cation whenever the DHCP server assigns a new IP address to the
B060-032-8. Enable the Mail Notifi cation feature and specify the Simple Mail Transfer Protocol (SMTP) server address, information for a valid e-mail
account on the server, and the e-mail address of the person to whom the message should be sent. To enable system event reports:
(a) Under System Event Report Settings, click Ye s to enable Mail Notifi cation.
(b) Enter the address of the SMTP server.
(c) If the SMTP server requires authentication, click Yes to enable SMTP Authentication. Skip to step (f) if not.
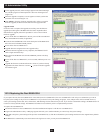
(d) In the Account Name fi eld, enter the username for a valid e-mail account on the SMTP server you entered in step (b).
(e) In the Password fi eld, enter the password for the e-mail account you entered in step (d).
(f) In the From fi eld, enter the e-mail address for the e-mail account you entered in step (d).
(g) In the To fi eld, enter the e-mail address of the person to whom the notifi cation message should be sent.
(h) Click Save and Restart. The B060-032-8 will save the changes, restart and return to the login page. If the B060-032-8 stalls during the Save and
Restart for more than 5 minutes, simply close out of the Internet and login using the IP Address you just set up. If this IP Address does not work, try
using the previous IP, or have your network administrator check for an automatically pulled IP Address on the DHCP server.
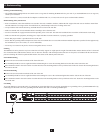
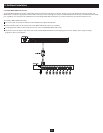
2
2
3
3
1
1