9
1
2
4
5
6
7
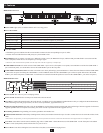
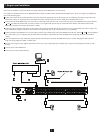
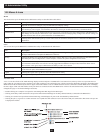
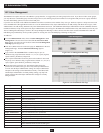
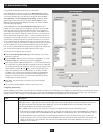
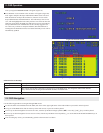
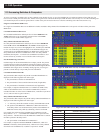
Cascading B060-032-8 Matrix KVM Switches
Cascading B060-032-8 KVM switches off of B060-032-8 KVM switches is the preferred method of expanding the number of connected computers/servers,
as it is the method that provides the most functionality. Cascaded B060-032-8 KVM Switches can support eight simultaneous users, whereas a daisy-chained
B060-032 supports only four, a daisy-chained B060-016-2 supports only two and a cascaded B007-008 supports only one. To cascade off of the B060-032-8
Matrix KVM Switch, Follow these steps:
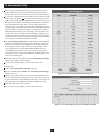
Before cascading additional B060-032-8 KVM switches, ensure that the fi rmware version of the B060-032-8 to be installed matches that of the fi rst-
level B060-032-8. B060-032-8 KVM switches with different fi rmware version numbers may be incompatible. See page 30 for more information on
verifying the fi rmware version number.
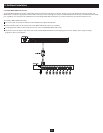
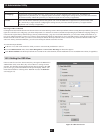
Use Cat5 cable to connect up to eight KVM ports on the fi rst-level B060-032-8 KVM switch to the eight user ports on the second-level B060-032-8 KVM
switch. The number of KVM consoles on the fi rst-level B060-032-8 that can simultaneously access the ports of cascaded KVM switches is limited by the
number of connections between the parent and child KVM switches. If you only have one bus connection, only one of the consoles attached to the master
B060-032-8 will be able to access the cascaded B060-032-8 at any given time. Without multiple bus connections, a console connected to the master
B060-032-8 Switch cannot access the cascaded switch unless there are no other consoles accessing the cascaded B060-032-8 at the same time. Repeat
for each second-level and third-level B060-032-8 KVM switch that you wish to cascade. The distance between the fi rst-level and last-level KVM switch
cannot exceed 1,000 ft. (300m). The maximum distance between any two B060-032-8 cannot exceed 500 ft. (150m).
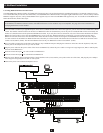
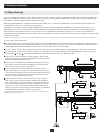
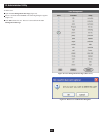
Use Cat5 cable to connect Server Interface Units (SIUs) to any available KVM ports and plug the connectors on the SIUs into the keyboard, video, and
mouse ports of the computers/servers you wish to install.
Plug the power cable into the power socket of the fi rst level B060-032-8, connect the power cable to a Tripp Lite Surge Suppressor, PDU or UPS System,
then turn on the B060-032-8.
Wait one minute and repeat for each second-level B060-032-8.
Wait one minute and repeat for each third-level B060-032-8.
Plug the power adapter cables supplied with the Console Interface Units (CIUs) into the power jacks on the rear of the CIUs, and plug the power adapter
into a Tripp Lite Surge Suppressor, PDU or UPS System.
Turn on the power to all connected computers/servers.
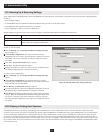
8. Multilevel Installation
3
3
3