26
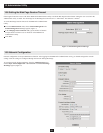
10. Administrator Utility
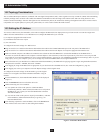
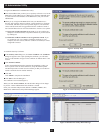
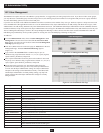
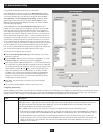
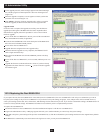
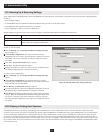
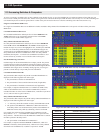
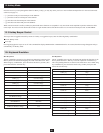
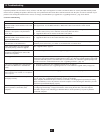
To open the Port Management Web Page for a KVM port:
In the B060-032-8 tree (on the left side of the Main Web Page), double-
click on a computer icon. Each computer icon corresponds to a KVM port.
You can also double-click on the Port ID of the desired port in the Port
Select Web Page. The Port Management Web Page for that KVM port
appears (Figure 20). Note: For ports of daisy-chained B060-016-2 and
B060-032 and cascaded B007-008 KVM switches, only the Port Settings
area of the Web page displays.
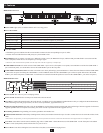
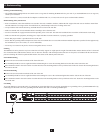
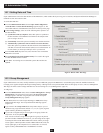
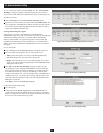
The Port Access area of the Port Management Web Page is used to
manage port access rights for users and groups. The boxes on the left side
of the page show all users and groups that have been created. The boxes
on the right side of the page govern port access rights. In the middle of the
page are fi ve sets of arrows. Each set contains two arrows, one facing to the
left (<) and the other facing to the right (>), which correspond to the boxes
immediately to the left and right. Arrows are used to move users and groups
from the boxes on the left into the boxes on the right and vice versa. These
boxes are discussed in the following table. Note: You cannot add more than
32 users and 32 groups to a KVM port. To add more than 32 users to a KVM
port, fi rst add the users to groups and then add those groups to the KVM
port. If a user is granted both user and group access rights to the same KVM
port, the user access rights will be applied, not those of the group.
To grant port access rights to users or groups:
Open the Port Management Web Page for the KVM port you wish to
grant access rights for.
In the Available Users box, click on a username to highlight it; or, in the
Available Groups box, click on a group name to highlight it.
Click the appropriate rightward facing arrow (>) to move the selected user
(or group) to the box on the right that corresponds to the access rights that
you wish to grant to the user (or group). The user (or group) appears in the
access rights box. Repeat and until you have assigned port access
rights (or restrictions) for all users and groups. If you make a mistake
by adding a user or group to the wrong access rights box, highlight the
username or group name again and click the corresponding leftward
facing arrow. The selected user or group will be removed from the box
and replaced in its former position.
Click Save. The selected users (or groups) are given the assigned
permissions.
To exit without saving changes, click any other menu or icon.
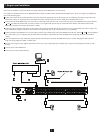
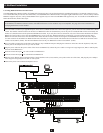
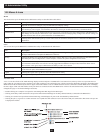
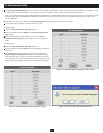
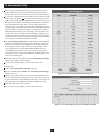
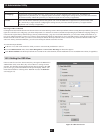
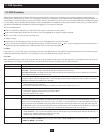
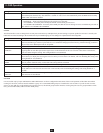
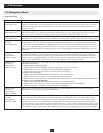
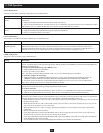
Confi guring Port Settings
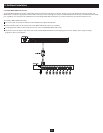
Before confi guring port settings, verify that the Server Interface Unit (SIU) for the KVM port to be confi gured is connected to the correct KVM port on the
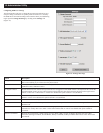
back panel of the B060-032-8. The fi elds in the lower section of the Port Management Webpage are described in the following table. Note: The only Port
Setting you will be able to change for a cascaded B007-008 or daisy-chained B060-032s and B060-016-2s is the Port Note.
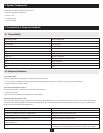
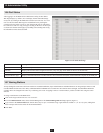
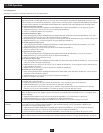
Field Description
Port Note Type a name in the Port Note fi eld. Port notes may be up to 15 characters long. Legal characters include: a-z, A-Z, 0-9, space
and hyphen. Enter a unique note for the port that will differentiate it from all other ports in the KVM installation. The port note
will appear on the Port Status and Port Select WebPages, as well as in the B060-032-8 tree view and in the OSD. When
searching, Port Note is the fi eld that will be searched.
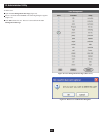
Note: Adding spaces to the port note will cause it to display on multiple lines in the tree in some Web browsers.
• If the KVM port cascades a B060-032-8, the port note is replaced by the station name of the cascaded B060-032-8, which will
always be the last 6 digits of the cascaded B060-032-8’s MAC address. To modify station names, see “Naming Stations,” page 17.
• For B007-008 KVMs and Computers/Servers connected to the B060-032-8 via Server Interface Unit (SIU), the Port Note
will be stored in the SIU. If moved to another port on the B060-032-8, the Port Note for the new KVM Port will automatically
change to the Port Note stored in the SIU. The Port Note on the old KVM Port will remain unchanged, requiring you to
manually erase or change it.
Figure 21: Port Management Web Page
1
2
2
3
3
4
5