


Upgrading an Enterprise 3000 to CMS R3V9
42 CentreVu CMS R3V9 Sun Enterprise 3000 Computer CVUE Instructions
Booting up the system with the new disk drives
Note:
When the upgrade is being supported by remote personnel, such as CMS
Provisioning, the system commands in this section are for use by remote
personnel to monitor the progress of the upgrade. Run the commands from
the local console only when instructed to do so, or when there is no remote
support.
To boot up the system with the new disk drives:
1. Turn on all external SCSI devices, starting with the device farthest from the system and
working toward the system.
2. Turn on the system monitor.
3. Turn on the system. Return the key switch to the position that was used by the
customer before the upgrade was started.
4. Close the front door of the system.
The system begins to boot up. If the boot fails, turn off the power to the computer and
check all device cabling. Cycle power on all external devices.
The power LEDs on the SCSI drives will light. Note that during boot-up, you might see
error messages concerning hardware for which software is not yet installed. This will
be corrected later in the upgrade procedure when the customer’s options are installed.
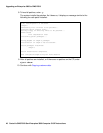
5. After the system reboots, log in as root.
6. If prompted for a password, press Enter. (At this point in the upgrade, there is no
password.)
7. If using the CMS console on site, open an XTERM window if one is not displayed.
Move the cursor into the window and click the left mouse button to activate that
window.
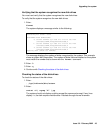
8. Continue with Verifying that the system recognizes the new disk drives on page 43.